Gradescope: Homework assignment
Homework assignments allow students to submit multiple pages or images in response to an assessment task. The information below provides an introduction to the Gradescope dashboard and step by step instructions for setting up a Homework assignment.
Workflow steps:
- Create your Gradescope course and link it to your Blackboard space. (Gradescope Get: Started)
- Sync your class roster (Gradescope: Get Started)
- Create your Homework assignment
- Create a Question Outline
- Create a Rubric
- Manage submissions
- Grade submissions
- Review Grades
- Releasing feedback and grades (publishing and posting steps)
Click the following link to download a full pdf guide : Homework assignment: Staff Guide
Homework assignment
A key benefit of Gradescope is that the marking workflow enables you to grade by question, rather than viewing / grading a full submission.
We recommend the Homework assignment for assessments:
- Which require handwritten submission. (Gradescope will also accept typed work and images).
- Which involve multiple questions or tasks.
- Where staff need to focus on marking a particular section of an assessment (eg. all answers for question 1).
Example scenario:
For example, if an assessment requires four different questions, you can create an appropriate question outline (eg. question 1, question 2 etc) during setup. Once the assessment is released students see the question outline by clicking on the assignment in their Gradescope dashboard. During submission students ‘tag’ each page / image to associate it with a relevant question. Once work is submitted you can click on a question title to view and grade all submissions for that question.
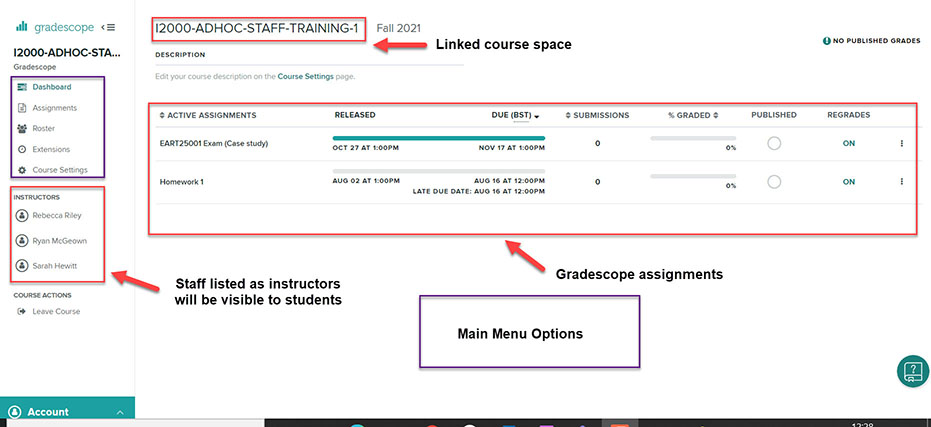
Gradescope Dashboard
When you click on a Gradescope course link from within Blackboard, you will be taken to the Gradescope Dashboard. For a quick guide on the different menu options check out Gradescope Dashboard: An Overview. To get started creating your assignment follow the step by step guide below.
Creating a Homework assignment
Once you have created your Gradescope course within Blackboard you can set up an assignment.
You will need to upload assessment information and instructions to Gradescope for your students to access. Gradescope refers to this document as your template (this could could simply be a list of questions).
On the Assignments page you will name your Homework, attach your template and determine the time period when the assignment will be available to students.
- Name: Clearly name your assignment.
- Template: Attach the assignment material here.
- Submission anonymization: Enable anonymous marking, if you have decided to use this feature.
- Who will upload submissions?: Select student (this will open up a longer set of options, where you will set the due date and time and any late submission criteria).
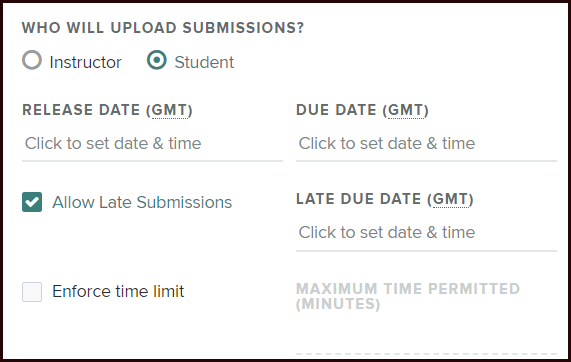
- Release date: Set the date and time that the assignment should become visible to students.
- Allow Late Submissions: You must Allow Late Submissions to account for DASS students and mitigating circumstances.
- Due date: Enter an appropriate date and time.
- Late due date: Enter an appropriate date and time for students with DASS / mitigating circumstances. (Note: Once the late due date has passed, the assignment link will become greyed out and students will be unable to submit.)
- Submission type: Choose variable length.
- Template visibility: Ensure the checkbox is ticked (to allow your students to view the template you have uploaded).

Click Create Assignment to save the settings you have selected.
Creating a Question Outline
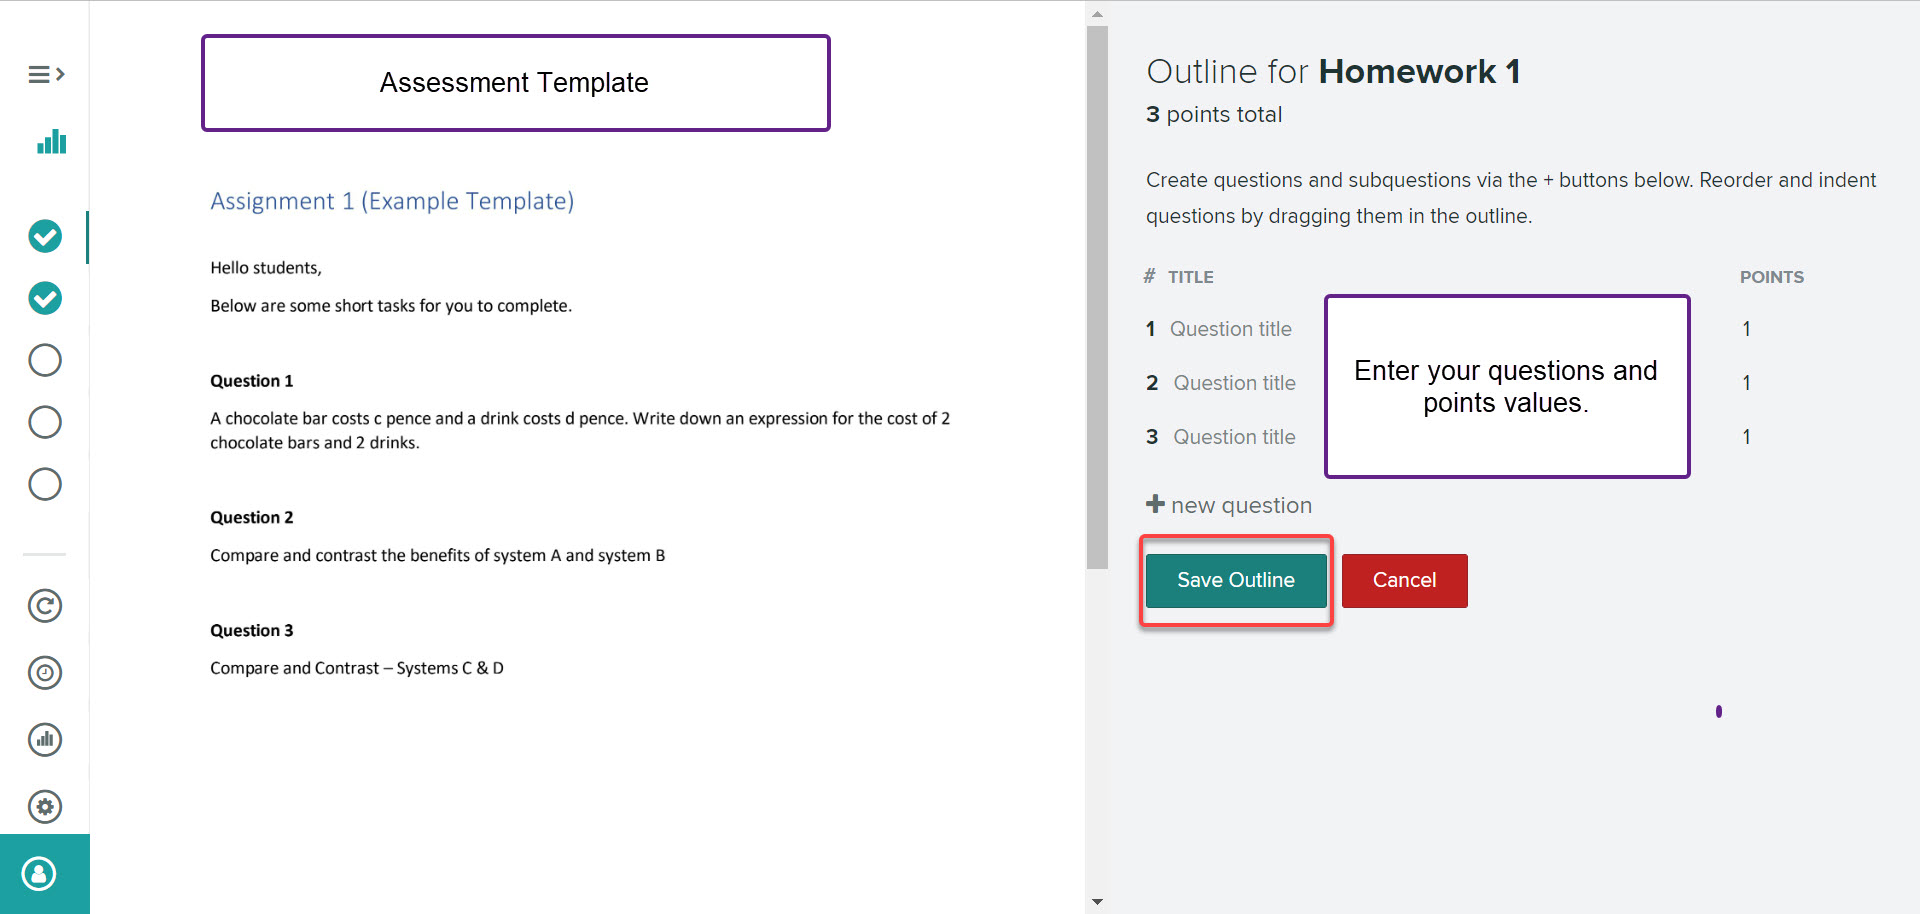
1. To start creating an outline click + new question to begin adding questions. You can enter a question title and add point values. As you build the outline, a total point tally for the assignment will appear at the top of the page.

2. You can create sub-questions by clicking the teal “add subquestion” icon (to the right of the red “x” delete icon), or by dragging a question into another one. You can also drag a subquestion outward to turn it into a question.
3. You can remove a question, a subquestion, or a group of subquestions by clicking the red “x” delete icon next to each of these items.
4. You may also replace the template PDF at any time by going to Settings in the left sidebar. Replacing the template will preserve the question outline and any grading you’ve already done for that assignment.
5. Once you are happy with your question outline click Save Outline.
If you need to make changes to your question outline open your Gradescope assignment and select the Edit Outline screen.
*Note: Once an assignment has been released to students they will be able to see the Question outline and points values via their Gradescope dashboard.*
Creating a Rubric
Gradescope allows you to create a rubric in advance or on the fly during grading. We recommend that you create your rubric before students submit to avoid any delays to grading.
The question outline and points values created at Edit Outline stage will provide an outline for you to build your rubric. By default the Create Rubric screen will show one rubric item underneath each question. Each rubric item will contain both a point value and box to enter your rubric item description.
For example in the screenshot below each question has a maximum points value of 25 points.
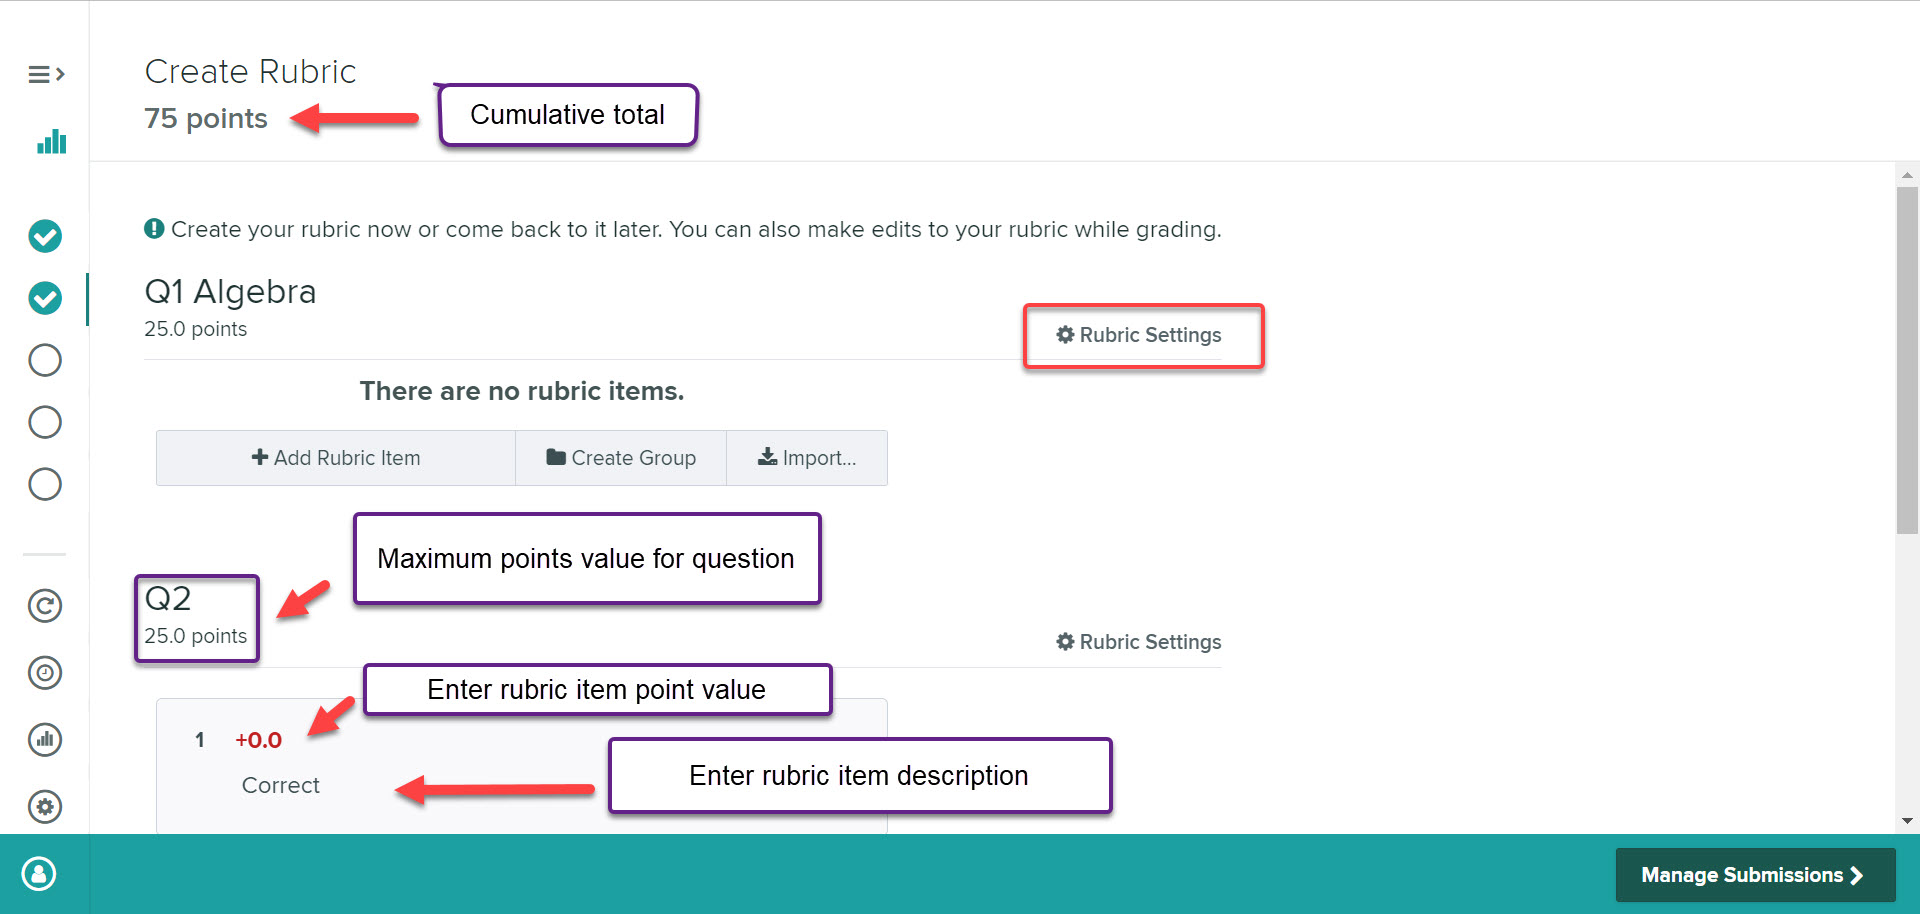
1. Click on a rubric item to edit the points value and item description. You can add additional rubric items by click on + Add Rubric Item. (Check out the Homework assignment: staff guide for some rubric examples).
2. Click on the cog icon next to Rubric Settings to edit the scoring methods (positive or negative) and score bounds (the maximum or minimum points for a question).
Rubric items and settings can be imported and reused across different questions or assignments. For further guidance see the Gradescope website.
How are rubrics used during grading and for student feedback?
During the Grade submission phase you can select appropriate rubric items to apply to student responses for each question.
Each rubric items selected will apply or deduct points to the student’s overall mark. The rubric item describes the reason why a student is receiving points or losing points.
Note: Rubric items are shared among all students for that question, so any changes made to rubric items during grading will affect all previously graded students. (If you change the point value or description of a single rubric item, the change applies to all students).
Once marking is completed and grades have been published via Gradescope, students will be able to see any rubric items applied to the submission as part of a feedback report.
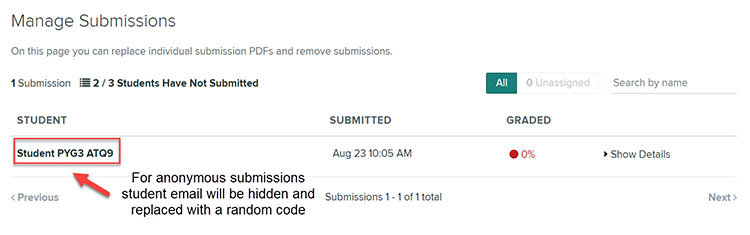
Managing Submissions
Grading Submissions
Once students have submitted, you can start to grade work.
- Navigate to your Gradescope course via Blackboard and click on the relevant assignment from the Gradescope Dashboard.
- Next, click Grade submissions from the left menu panel to show the grading dashboard for the assignment that you need to grade.
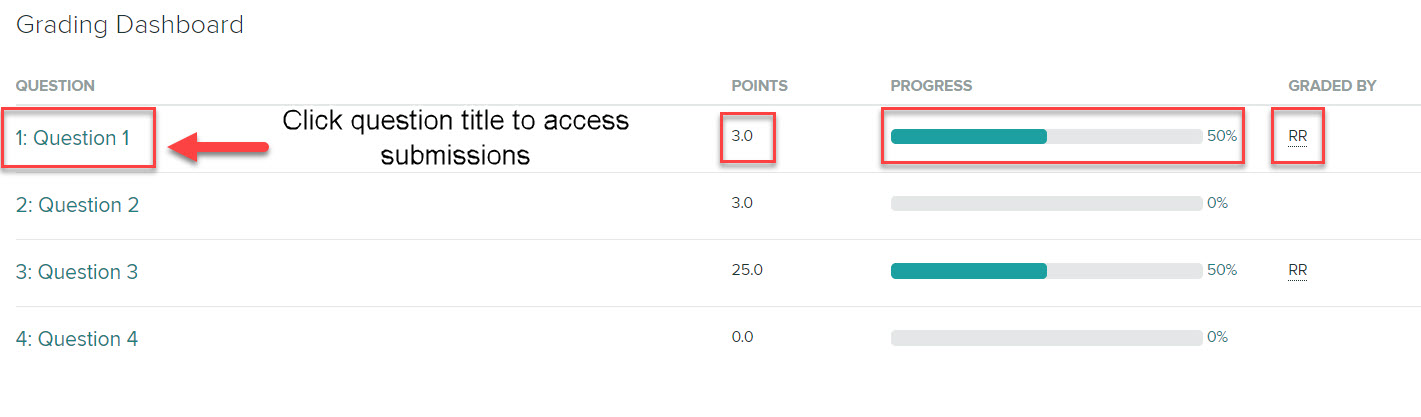
3. Click the question that you wish to grade to open a new screen containing student submissions for that question. On the bottom menu panel you’ll see which submission you are currently viewing eg. 1 of X.
4. Click on full page or use the magnifying class icons to change the view of the submission.
Example submission:
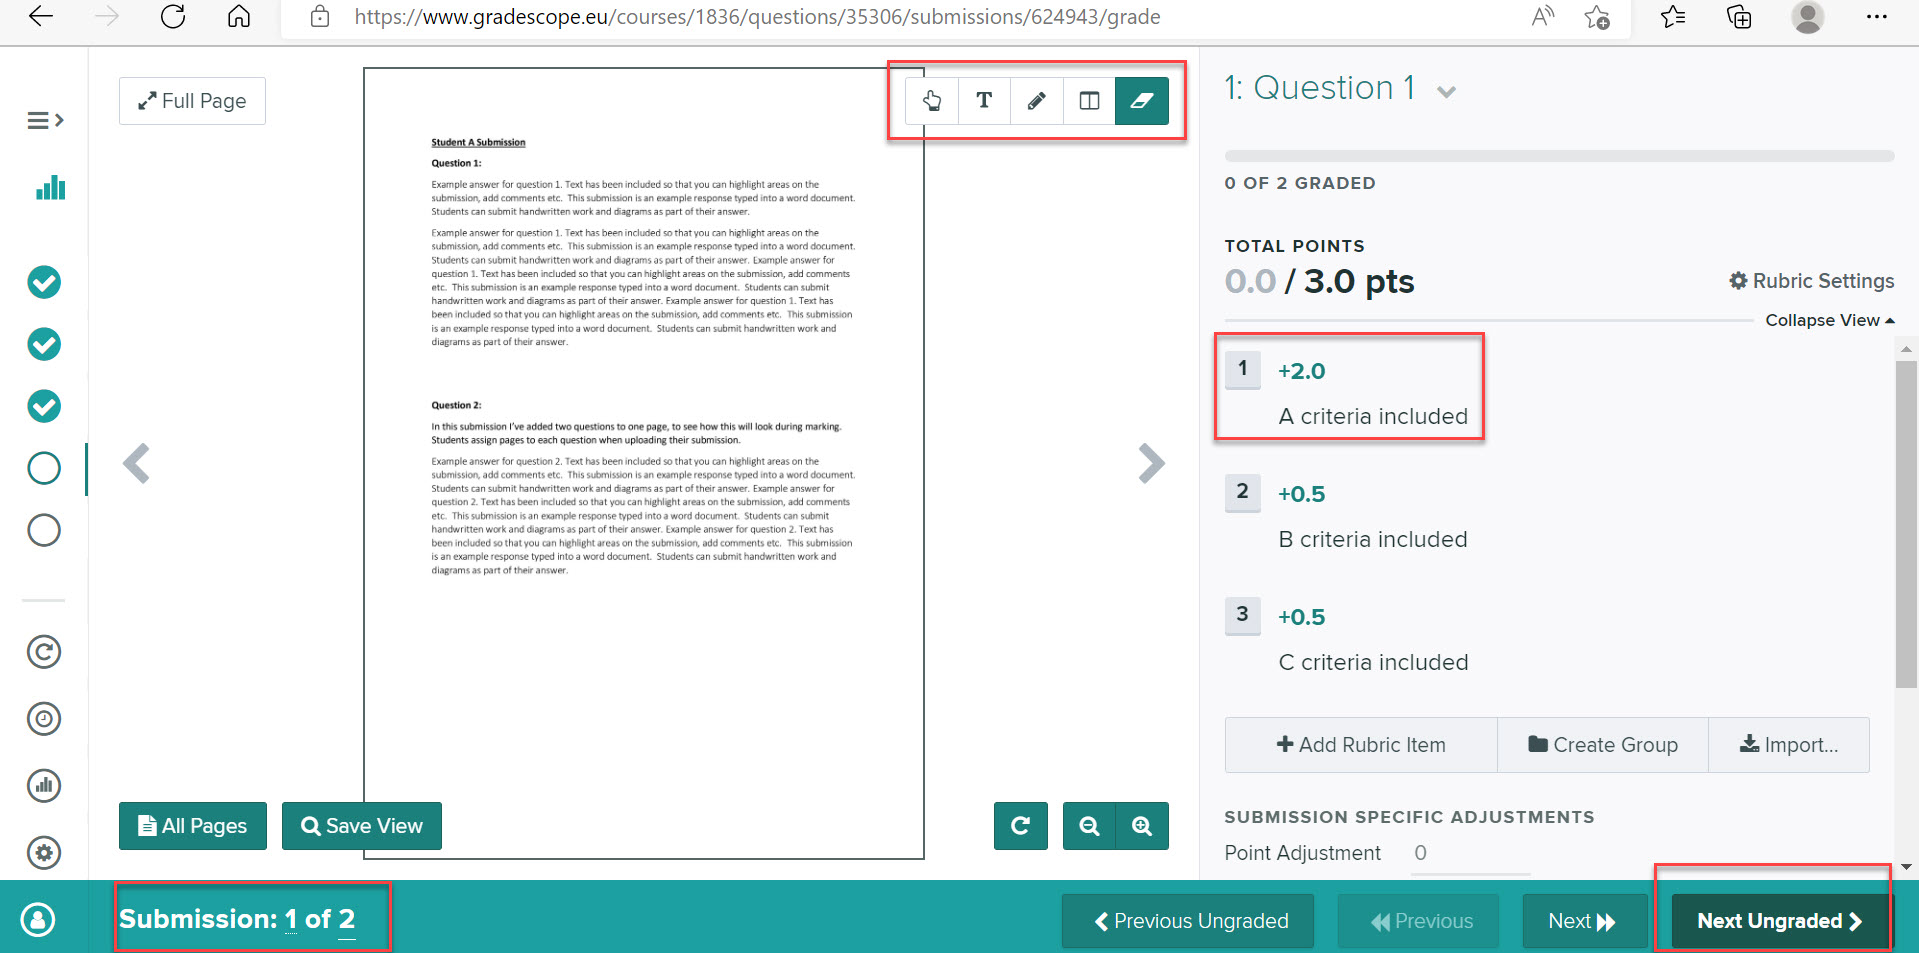
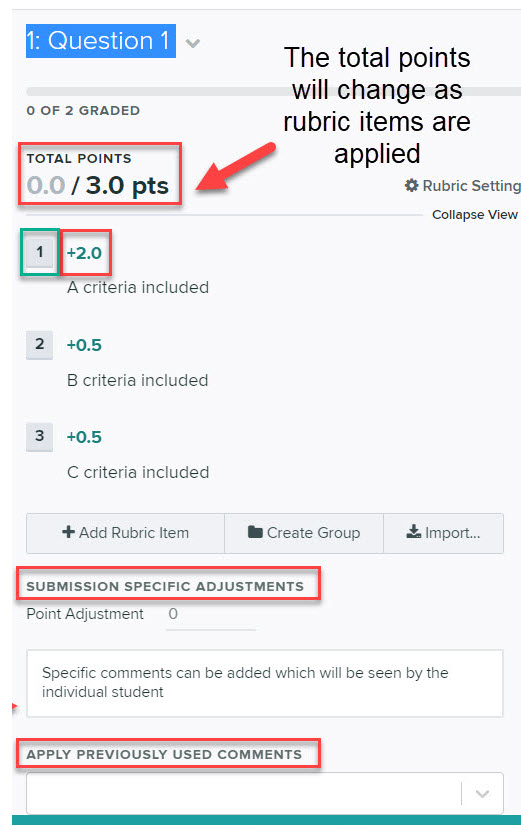
5. To start grading, click on the number of the rubric item that you want to apply. Gradescope will save each rubric item that you select and the total points tally will update as you apply rubric items.
*Note: Gradescope will allow another member of staff to change and overwrite a rubric statement that you have applied. Gradescope does not retain an audit trail of changes, but will display the initials of staff who have graded a question via the grading dashboard).*
6. Use the subject specific adjustments section, if you would like to enter overall feedback comments for the student you are grading.
*Note: once you have entered comments Gradescope will store those comments and they will be available to use as previously used comments*
7. To annotate directly onto the students submission, hover your mouse to reveal the annotation tools (navigation tool, text tool, pencil tool etc).
- The navigation tool will help you place annotations in the right spot by allowing you to click and drag to move around a student’s submission.
- The text tool allows you to type comments directly on the submission. After selecting the text tool, click anywhere on the page to add anchored text to that spot. Or to quickly add text from the navigation tool, just double click on the page. Text annotations will be autosaved and can be reused.
- The pencil tool allows you to mark freeform on the submission.
- The box tool allows you to boxes by clicking and dragging to create rectangles on top of the submission.
- The eraser tool allows you to click on any annotation to remove it.
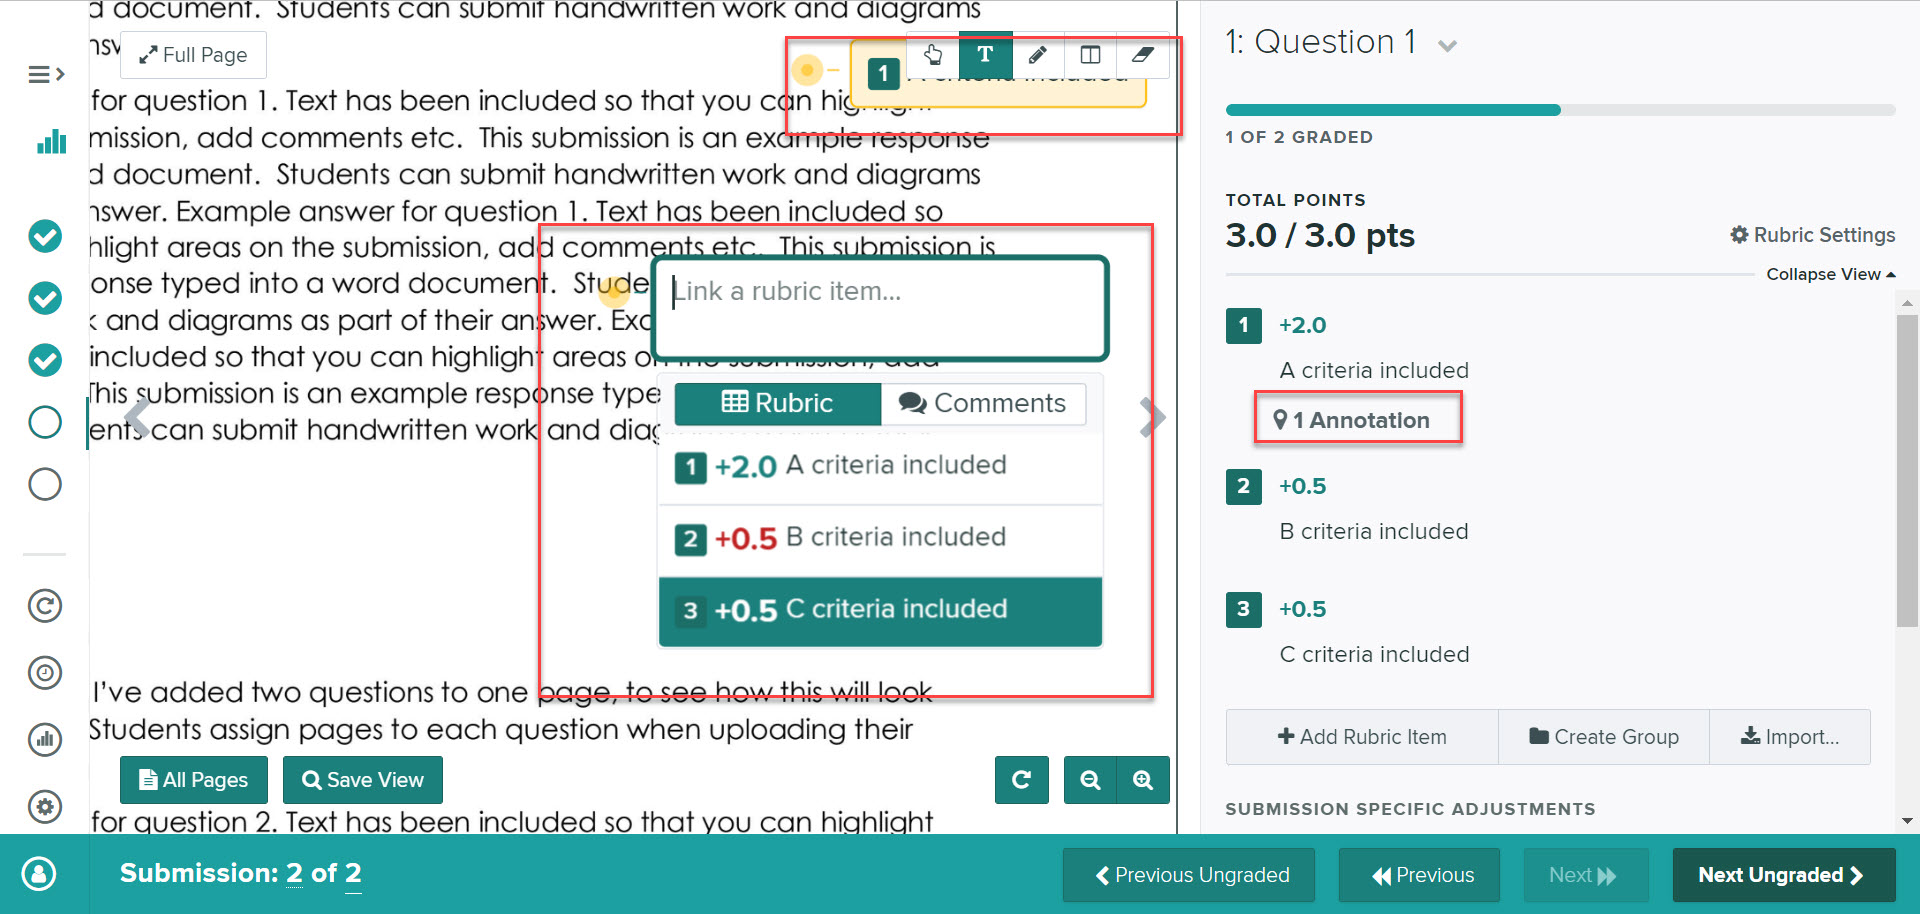
8. To link a text comment to a rubric item, click on the text tool, next click on the area of the document you wish to annotate. A new box will appear (select the chosen rubric item), then click on comments and add your comment. Any annotations linked to rubric items will be indicated underneath the rubric item on the right of the screen.
9. Once you have finished grading the submission, click Next Ungraded (use this option to ensure that you don’t begin grading work that another colleague may be grading).
Once all grading is completed, the next stage in the grading process is to Review Grades.
Review Grades
The review grades screen provides an overview of graded work and allows you to check grades and feedback for individual students. To do that:
- Navigate to your Gradescope course via Blackboard and click on the relevant assignment from the Gradescope Dashboard.
- Next, click Review grades from the left menu panel.
- Click on a student name or pseudonym (if anonymous marking is enabled), to access a student’s full submission, including full grades and feedback. (You can also download a copy of the individual submission and view the student’s submission history).
Review grades screen:
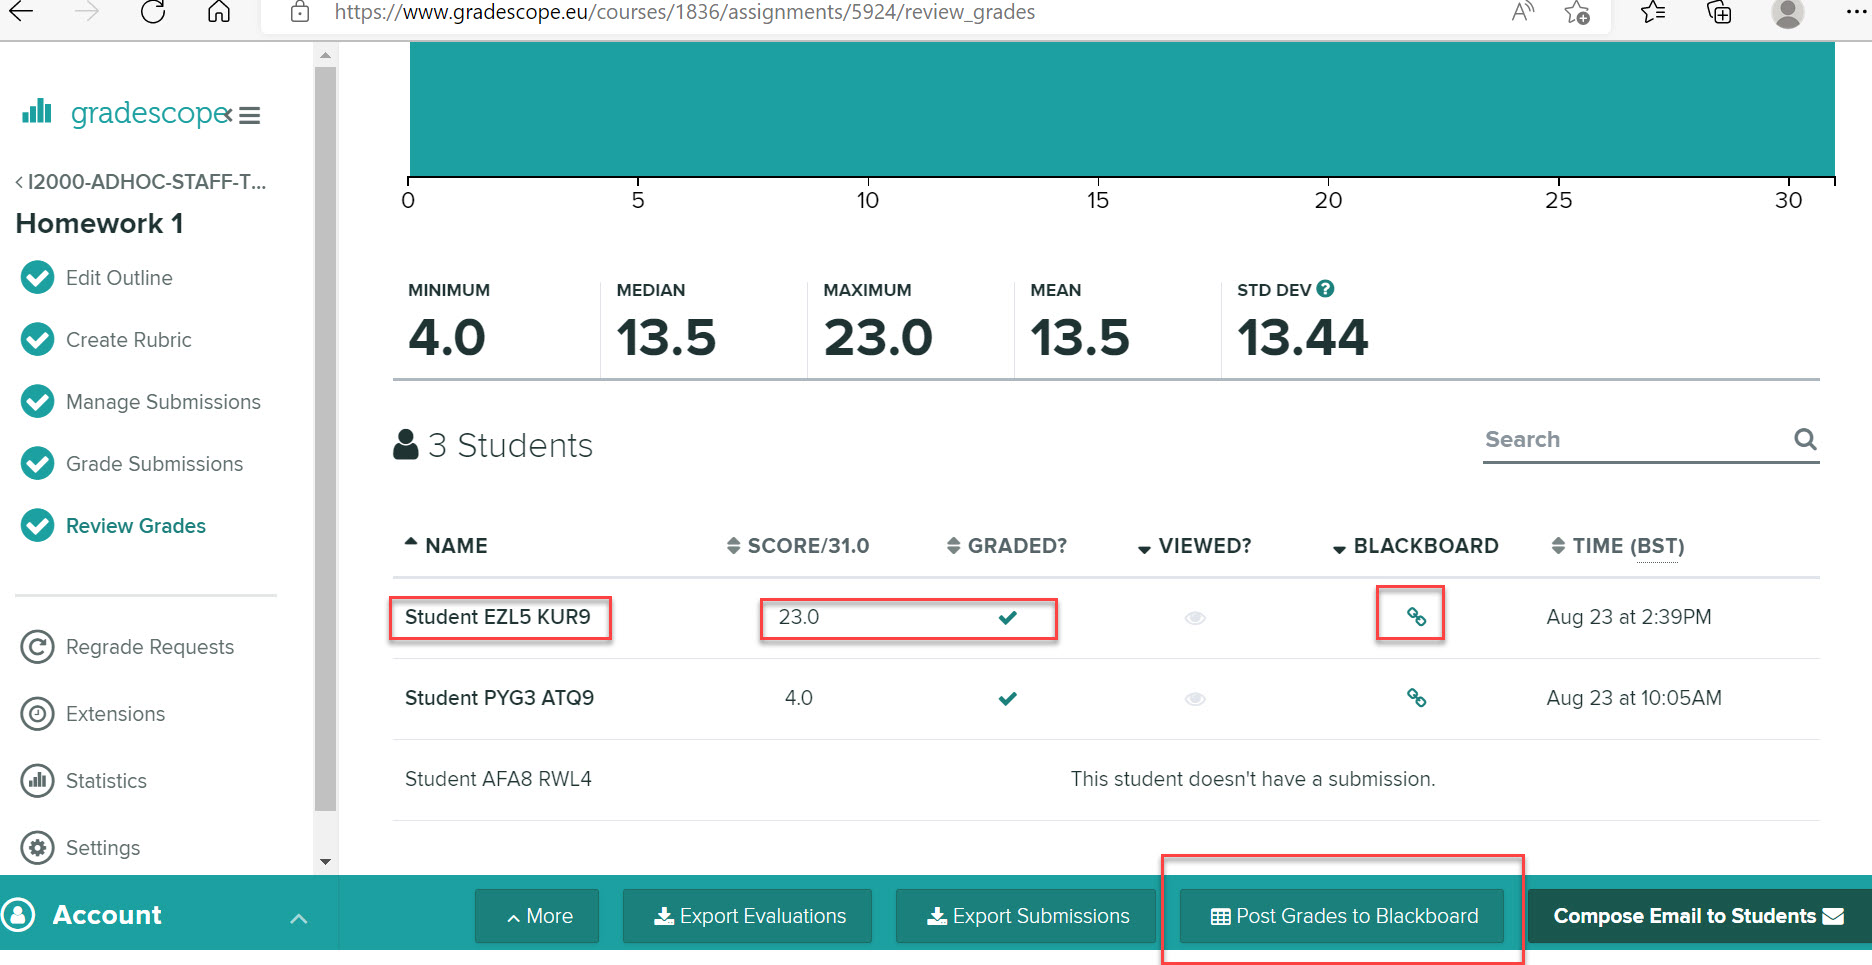
You can also use the menu options within this screen to download grades, export evaluations or submissions, post grades to Blackboard and publish grades.
Releasing feedback and grades
There are two stages to releasing grades.
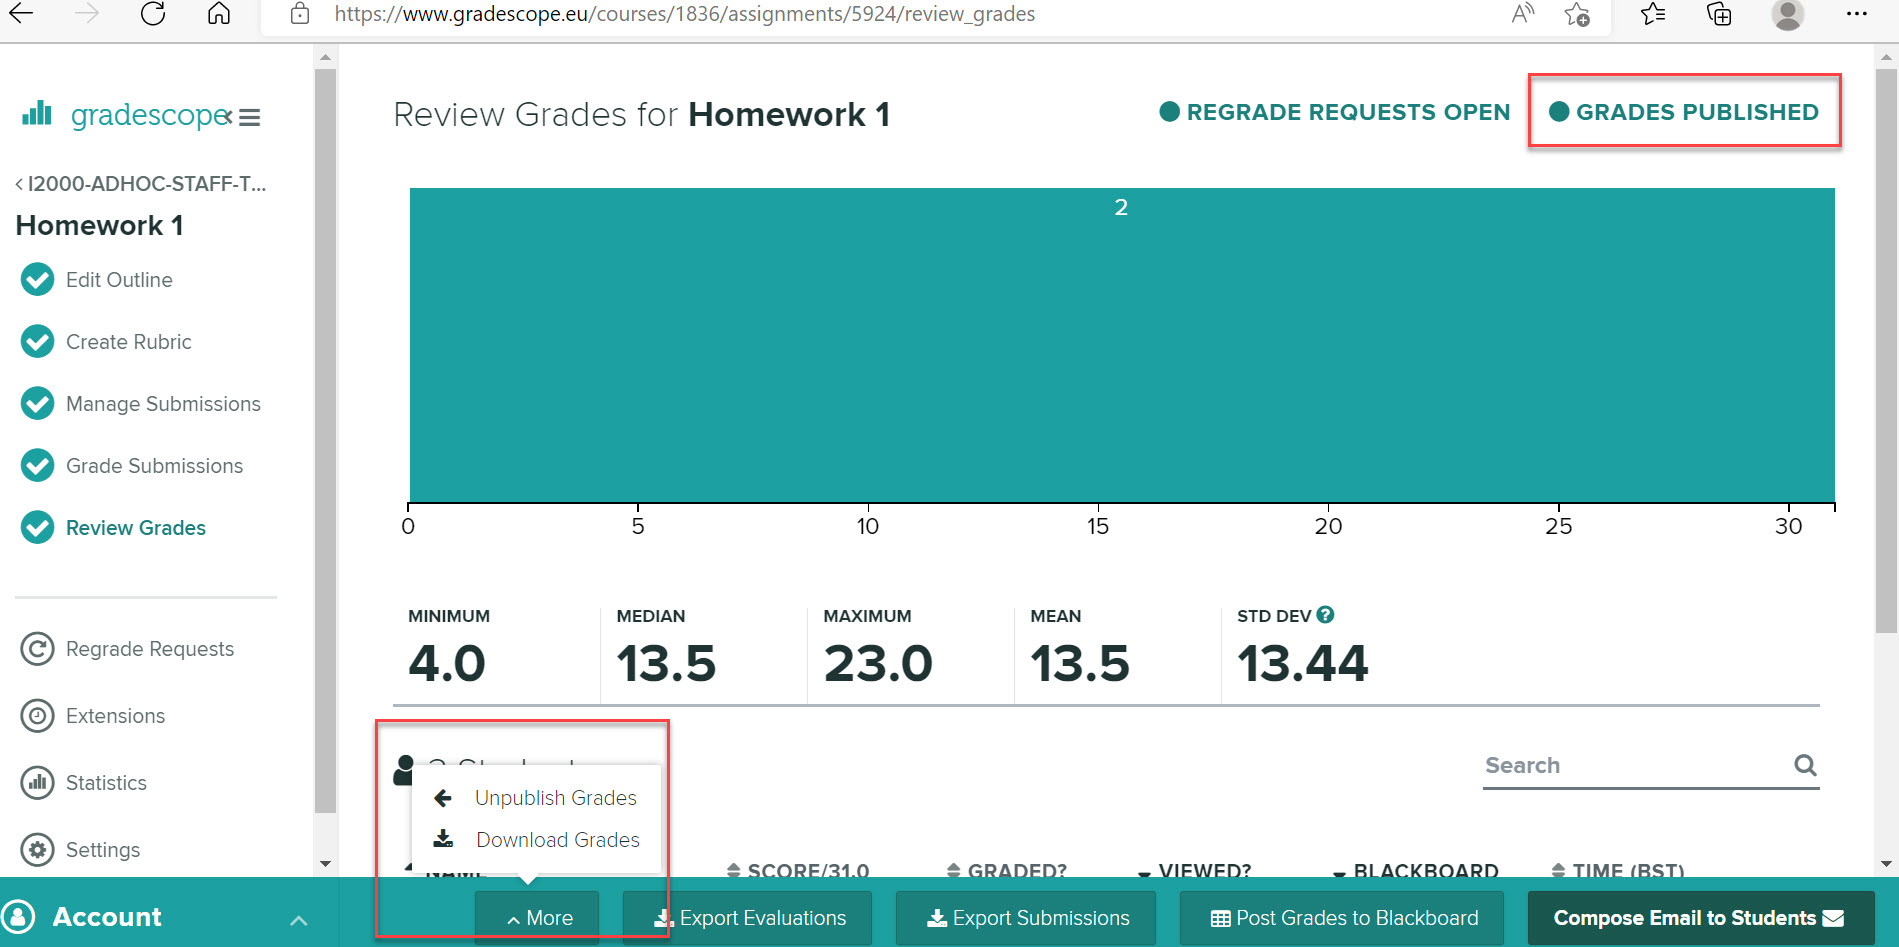
Publish Grades which releases feedback to students via Gradescope. Students open their Gradescope dashboard and click the assignment to view any rubric items, overall comments and points applied during marking. (Students can also download an annotated copy of their submission.)
To publish grades open your assignment in Gradescope, select the Review Grades menu and then click on Publish Grades.
Post to Blackboard which is used to push the student’s overall mark to a column within the Blackboard Grade Centre (see instructions – Gradescope: Get Started- Post to Blackboard)
Unpublishing Grades
You will be able to see which students have viewed feedback via Gradescope in the Review Grades screen.
To Unpublish grades go to Review Grades, click on More then Unpublish Grades. If you have posted grades to Blackboard, you will also need to hide the associated column in the Blackboard Grade Centre.
If you need to withhold grades from a specific student, the easiest way to do that is to un-grade one question within the submission. Check the Review Grades page to make sure that the graded checkmark is greyed out for the affected student, before publishing and posting grades.