Gradescope: Get Started
If you’re not familiar with Gradescope check out our overview:
Gradescope: Get Started
Below you will find step-by-step instructions with videos on how to setup Gradescope for your Blackboard course space. For a round of useful resources (including setting up different types of assignment) check out Gradescope: Frequently Asked Questions.
If you’re not sure whether Gradescope is the right tool for you, or would like some further support book a one-to-one slot with one of our eLearning team.
Create and link your Gradescope course
The first step you’ll need to take is to create a Gradescope course within Blackboard. Once you’re Gradescope course is created, you’ll can link it to your Blackboard course unit.
- Log in to Blackboard. Click on the Blackboard course you’d like to link to Gradescope. Switch on Edit Mode.
- Next, click Content> Tools > More Tools > Gradescope.

- Link information: Name the link to match your course. If you want the Gradescope link to be available now, under options>available leave the button marked yes. If you’d prefer to hide the link until you are ready to release the assignment choose no. Click submit when done.
- Next click on the Gradescope link you created to launch Gradescope. Once Gradescope launches, you’ll see a dialog box with course-linking options. Choose to Link with ‘A new Gradescope course’ and then select Link Course.
- Next you will see the Course Settings page. Most information on this page can be left as the default values. You can update the course title, description, rubric types, and score bounds as needed. Keep in mind that course title and description changes made here will only appear in Gradescope, not in Blackboard.
- When you’re finished, select Update Course. Your course is now linked, and your students can access this Gradescope course (unless you have hidden the link within Blackboard). Now, it’s recommended that you sync your roster.
Syncing your Roster
Once you have created your course, we recommend you sync your roster.
- Launch your Course Dashboard in Gradescope. If you’re continuing from the steps in the section above, you will already be there. If not, log in to Blackboard, open the Blackboard space you have created your Gradescope link in and click on the link to launch the Gradescope Course Dashboard.
- On your Course Dashboard, expand Gradescope’s left sidebar (if it isn’t already) and click Roster to get to your Roster page. On your Roster page, click the Sync Blackboard Roster button.
- Next, a dialog box will appear explaining how accounts will be synced. All names, emails and student IDs will be auto-synced from Blackboard. Group information setup in Blackboard will not be synced, but you can then add groups – known as sections of students in Gradescope, see Gradescope Help Center: Adding sections to the roster.
- By default, Gradescope will email users to say that they’ve been added to the course. We recommend that you uncheck “Let new users know that they were added to the course” in the dialog box.
- Click Sync Roster. If students add/drop in Blackboard, be sure to re-sync the roster. Note that existing submissions/grades for dropped students will be preserved.
Setting Up Assignments
- Navigate to your Assignments page in Gradescope. If you’re continuing from the steps in the section above, you will already be there. If not, log in to Blackboard, open the Blackboard space you have created your Gradescope link in and click on the link to launch the Gradescope Course Dashboard.
- On your Course Dashboard, expand Gradescope’s left sidebar (if it isn’t already) and click Assignments to open the assignment page, then click Create Assignment to make a new one.
- Next choose the assignment type.
- For further information on assignments set up check out the posts: Gradescope: Homework assignment and Gradescope: Bubble sheet
- Once you have selected your assignment and chosen settings click Create Assignment.
For student-uploaded assignments, once your release date passes in Gradescope, students will be able to submit work via the Gradescope course link in their Blackboard course.
Grade Submissions
The grading process that you follow will depend on the type of Gradescope assignment that you are using.
To access a Gradescope assignment:
- Open your Blackboard course, locate and click on your Gradescope course link. When the Gradescope dashboard opens click the assignment title to access submissions.
For further information on grading check out the posts on check out the posts: Gradescope: Homework assignment and Gradescope: Bubble sheet
Posting Grades to Blackboard
To post grades to Blackboard, you will need to:
- Set up a Blackboard Gradecentre Column and hide the column from students (if appropriate).
- Link your Blackboard Gradecentre Column within Gradescope.
- Post Marks to Blackboard from the Review Grades screen in Gradescope.
Watch the short video below or follow the step by step instructions.
Set up a Blackboard Gradecentre Column
Follow the instructions below to set up Blackboard Gradecentre column.
- Open the Blackboard course that contains your Gradescope assignment and switch Edit Mode on.
- Next click, Control Panel>Grade Centre>Full Grade Centre
- Once your Grade Centre opens, click Create Column.
- Name your Grade Centre column, choose category type Assignment. Ensure the possible points matches with the maximum score possible for your assignment.
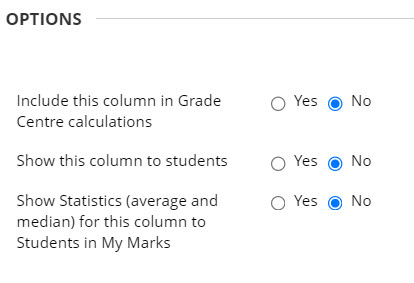
- If you want the Gradecentre column to remain hidden from students then ensure that you select the No for all the radio buttons within the Options section.
- Choose Submit when done to create your column and check that the column is visible to you in Gradecentre.
Link your Blackboard Gradecentre column within Gradescope
Once you have created a Blackboard Gradecentre column for the assignment, you can link the column to Gradescope. There are two options to link your Blackboard Gradecentre column with your Gradescope assignment.
Option 1: Via Gradescope Dashboard (assignment settings)
- Launch Gradescope tool from your Blackboard course by clicking on your Gradescope course link. In the Gradescope dashboard click on the … icon next to the assignment title and then select assignment settings.
- When the dialog box appears, under Blackboard assignment choose Link. A dropdown list should appear containing all of your Blackboard Gradecentre column headings. Select the appropriate column from the list.
- Make sure to Save when prompted to apply changes.
Option 2: Directly from Review Grades screen
- Launch Gradescope tool from your Blackboard course by clicking on your Gradescope course link.
- Select the relevant assignment from the Gradescope dashboard.
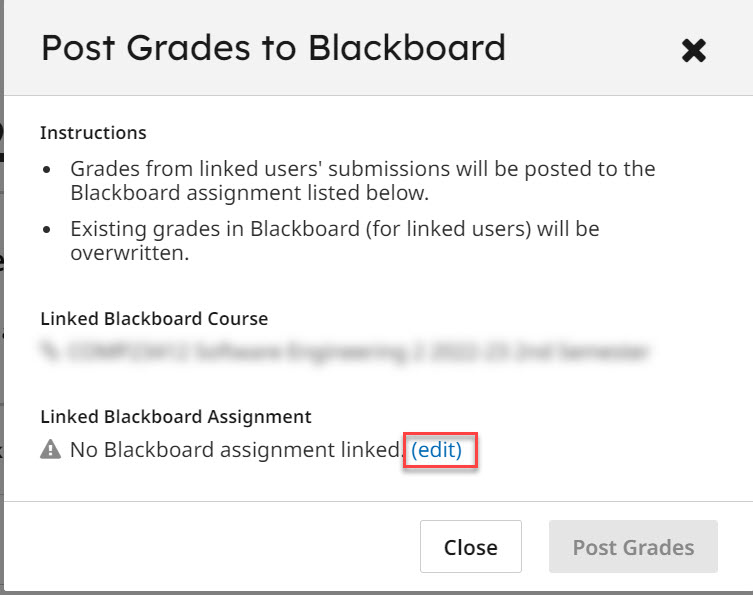
- Next go to Review Grades and select Post Grades.
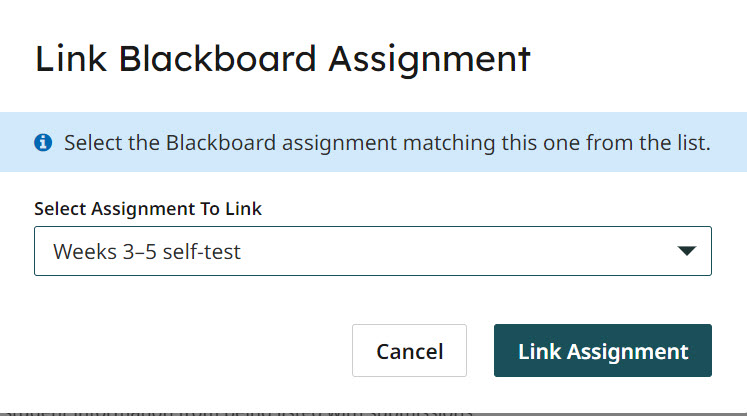
- In the pop up window under Linked Blackboard Assignment click on the Edit link, to access a dropdown list. Next select the appropriate assignment from the dropdown list and choose Link Assignment.
Post Grades to Blackboard via the Review Grades Screen
Once you have set up and linked your Blackboard Gradecentre column, you can post marks from Gradescope to Blackboard. Before posting grades to Blackboard, check that the Gradecentre column is hidden (if you do not want students to see grades straight away).
To post grades follow the instruction below:
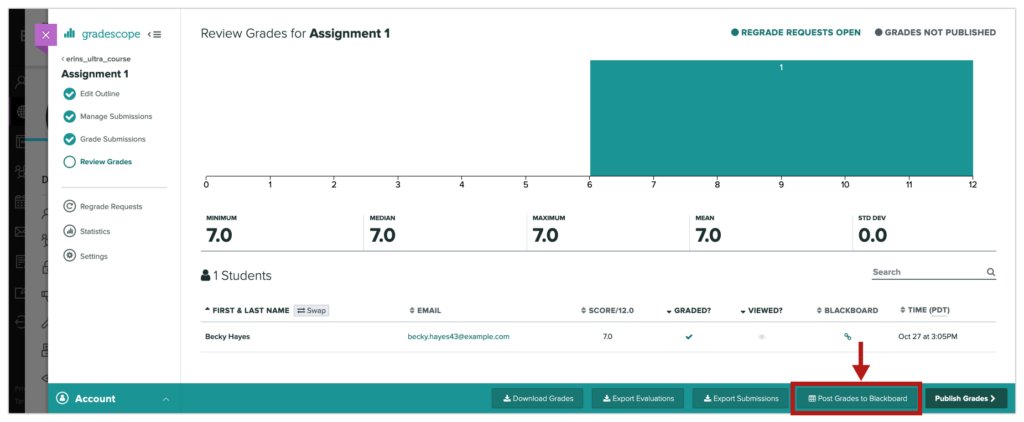
- Click on your assignment from the Gradescope dashboard and choose Review Grades.
- In the Review Grades screen Gradescope, choose Post Grades to Blackboard. When the dialog box appears, choose Post Grades.
- A popup box will appear. You should see both the Linked Blackboard course and Linked Blackboard assignment. If these are both correct, then click Post Grades.
Note: Posting Grades to Blackboard will only post the students’ final assignment scores from Gradescope to the corresponding Blackboard grade column or gradebook item. Only grades for fully graded submissions (which have a checkmark in the Graded column on the Review Grades page) will be posted.
- You should see a success notification within Gradescope. You can also check the Gradecentre in Blackboard to confirm that the marks have been transferred.
Publishing Grades (within Gradescope)
If you want students to also see their graded, annotated submissions, question-by-question scores, rubrics, and feedback on Gradescope, click the Publish Grades button. If you’d like to, click the Compose Email to Students button at the bottom of the Review Grades page in Gradescope to alert students via email that their grades are now visible. To see what your students will see when they view their grades, check out the article on Using Gradescope with Blackboard as a Student.