Blackboard Groups – creating sign up sheets

You can use the Sign-up Sheet feature when creating a self enrol group, to allow students to register for an event, for example a lab session. You can also control the maximum number of students who can register via a Sign-up Sheet to manage group size. Bear in mind that sign up groups that you create in Blackboard are not displayed automatically as part of student’s timetable.
The steps to complete are:
- Create a sign up sheet.
- Create a tool link so students can access the sign up sheet.
- Make sure groups are available to students.
The guidance below also includes information on how students can access the sign up sheet and how to add or delete a student from a group.
Creating a sign up sheet
To create a sign up sheet follow the instructions below:
- First ensure Edit Mode is switched ON in the Blackboard space.
- In the Control Panel choose Users and Groups>Groups to open the groups page.
- Next, choose Create> Group Set>Self Enrol.
- Enter a Name for the group. (Blackboard will automatically number the groups eg. Lab Group1, Lab Group 2 etc.)
- Description: This box can be left blank. (Note: You will be able to include instructions in the Sign-Up Options section in the next steps, which will appear on the Sign-Up page for students).
- Next to Group is visible to students choose Sign-up Sheet Only.

- Next go to the Sign-Up Options section.
- Enter a Name for the sign up sheet eg. Lab Groups Semester 2.
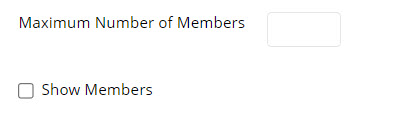
- If you want to limit the number of students in a group, then enter a value in the Maximum Number of Members field.
- Tick Show Members if you would like students to be able to see other group members before they sign up.
- Allow students to sign-up from the groups listing page can be left as default (ticked).

- Choose Submit to create the group(s). The groups should now be visible to you via the Groups page.
Create a link to the sign up sheet
Next, you will need to create a link within an appropriate page within Blackboard, for students to access the sign up sheet. To do that follow the instructions below:
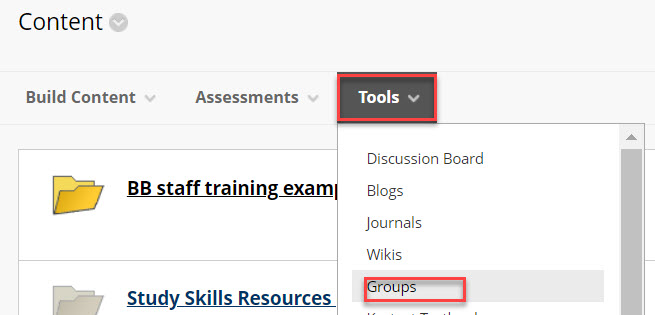
- First navigate to the page in Blackboard that you want to create link in eg. Content page.
- Next in the Tools Menu select Groups.
- In the Create Link: Group section, choose Link to a Group Set. Use the dropdown list to select the appropriate Group Set.
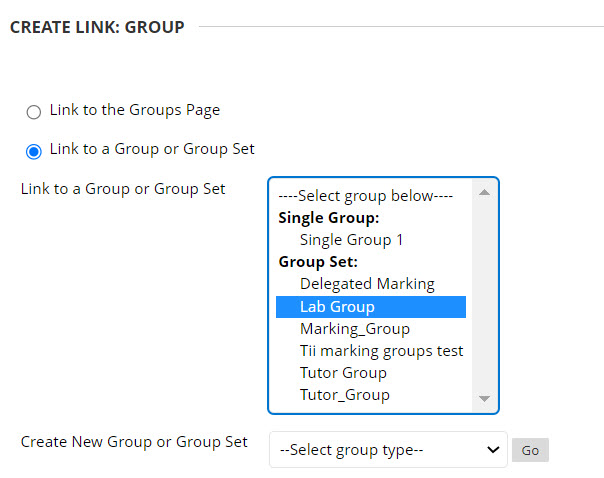
- Click Next. A new window should open containing the Link information
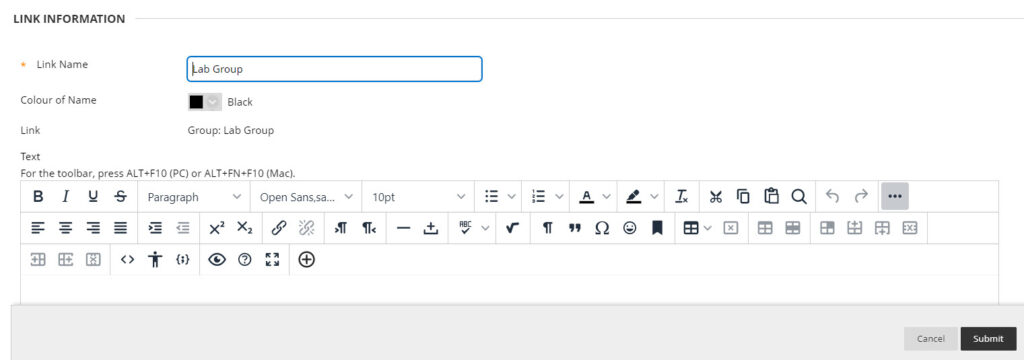
- You can change the name of the link if you need to eg. Lab Group – Sign up sheets. You can also enter a description, which will appear under the link name. For example, click the link above to access the Lab Group sign up sheets.
- In the Options section the Available should be set to Yes so that students can see the link.
- Choose Submit to save the changes.
- Your tool link (see example below) should now appear within the content area.

- If you need to make changes to the link name, description or availability click on they grey arrow next to the link name and choose Edit.
Make groups visible to students
Finally, you will need to ensure that groups are visible to students. To do that follow the instructions below:
- Go to Control Panel>Users and Groups>Groups
- In the Group Set Column, click on the grey arrow next to the name of the Group Set.
- Next choose Edit Group Set Properties.
- Under Group Information, change Group is visible to students from Sign up sheet only to Yes. (The change will be applied to all groups in the group set).
- Click Submit to save and apply the changes.
How do students access the signup sheet?
Students can access the sign up sheet via the Tool link that you have created.

It’s important to let students know that once they have selected a group via the Sign-Up sheet, they will not be able to change to a new group themselves via Blackboard. If a student needs to move to a different group, a member of staff will need to delete them from the existing group and add them to a new group.
Student view – sign up sheet
Once students have clicked on the Tool link, they should see the sign up sheet window, where they can select a group.
- Within the sign up sheet page students will see the Sign-Up Sheet Instructions, Group names, Maximum members allowed, other student names (if you have enabled this option) and a button to Sign Up.
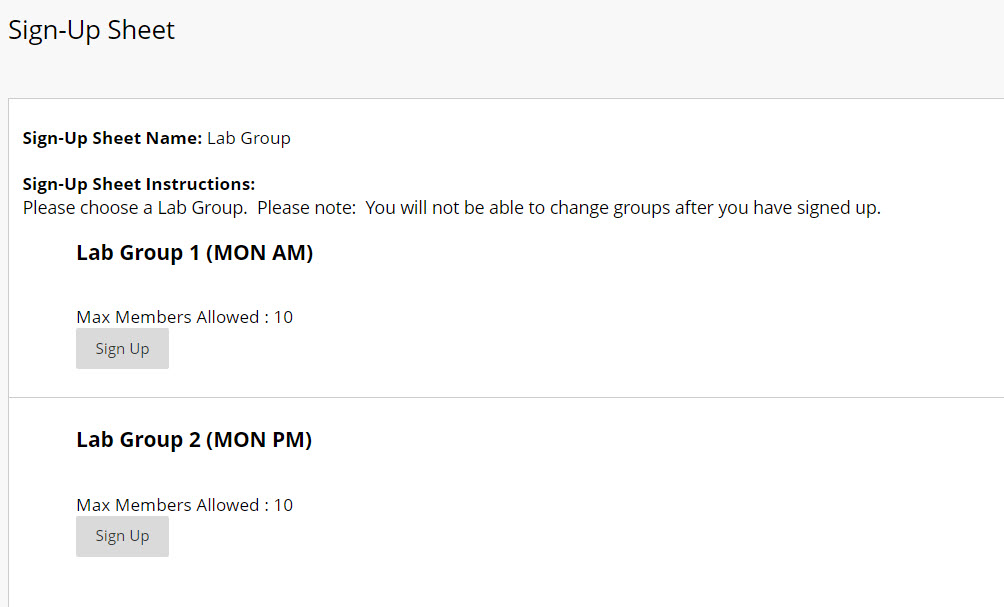
- After students click on a Sign Up button, they should see a success notification.

How do I add or remove a student from a group?
You can move a student to a new group by following the steps below:
- Go to Control Panel>Users and Groups>Groups
- In the Groups page select the All Users tab.
- You should now see a list of users, next to each user will be a list of the groups they are enrolled on.
- Set the search fields to Last Name, Contains, then enter the user’s surname.
- If more than one student has the same surname, use the username to identify the correct student.
Remove a student from a group:
- In the Groups column, to remove a group click on the cross by the group name.
Add a student to a group:
- In the Groups column, to add a student to a group hover your cursor over the Group column reveal + Add Group.
- Choose +Add Group, next select the appropriate group from the dropdown list and choose Submit.
- You should now see the new group listed next to the relevant student.