Reconciling marks: Part 1

Delegated Marking is a Blackboard Assignment feature that can be used to facilitate the delegation of marking to multiple markers when double marking is required.
The first and second marker can work in parallel to mark a submission and provide separate provisional marks and feedback to students. The role of reconciler is to review and ‘reconcile’ provisional marks to produce a final ‘agreed’ grade. If you need to set up a delegated marking assignment check out our guide for setting up and enabling delegated marking.
What key decisions need to be made?
Ideally, the course team should decide the following before staff reconcile marks:
- What feedback and marks will be released to students (so that appropriate settings can be selected).
By default students will be able to see provisional marker feedback unless the default setting is changed during the reconciliation process. If you choose to reveal the completed marking rubrics, bear in mind that if there is a significant difference of opinion, this could be reflected in the marking rubric. Inconsistency in marking could potentially be put forward as a grounds for appeal against a mark.
- Which member(s) of staff will be responsible for reconciling marks, to ensure they have appropriate permissions. (See guidance below ‘Blackboard setup for reconcilers‘)
In this article (Part 1) we’ll look at.
- How to check delegated marking settings (if you cannot see the reconcile marks option).
- How to access assignments, view marks/ feedback from provisional markers, enter a reconciled grade and optionally enter reconciler comments.
If you would like more information on the student view or need to change settings that control the information students see via My Marks check out Reconciling marks: Part 2.
Blackboard setup for reconcilers
To check that you have been correctly set up to reconcile marks follow the steps below:
- First, ensure that Edit Mode is switched ON in the Blackboard space.
- Locate the Blackboard assignment and click on the grey chevron next to the assignment title.
- Next, choose Edit to open Blackboard assignment settings.
- Scroll down to the Marking section. For delegated marking assignments Enable delegated marking should be ticked.
- In the dropdown choose All Possible Markers for a full list of staff.
Locate your name in the Marker column.
To reconcile marks, you must have the following settings next to your name:
- Submissions to mark column must be set to All Submissions.
- Reconcile marks column you must have a tick in the checkbox Can reconcile marks.
- View Settings (this box is automatically greyed out when Can reconcile marks is ticked).

How to view and enter marks and feedback
You can either watch the short video below which shows how to access an assignment and reconcile marks. Alternatively you can follow the step by step instructions, which also include how to bulk agree marks for all unreconciled assignments.
Accessing the Blackboard assignment
To access a Blackboard assignment that you need to reconcile marks for, follow the steps below:
- Go to Blackboard Gradecentre>Full Gradecentre
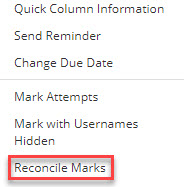
- Locate the relevant assignment and click on the grey chevron next to the assignment title, then choose Reconcile Marks, to access the reconcile marks view.
Understanding Reconcile Marks view
After you have chosen Reconcile Marks for the relevant assignment in Gradecentre, you should see a table of submissions. From this view you can:
- Use filters to change which assignments you see and track marker progress.
- Access the full student submission, together with first and second marker feedback.
- Choose whether to change the default setting (to release provisional marker feedback to students).
- Bulk reconcile agreed marks.

Using filters and tracking marker progress
- You can use Filters to control the submissions that you see:
- Use Filter by Status to view either all submissions or just those that have been reconciled or not reconciled.
- Use Filter by Marker to display submissions by marker.
- Choose Show Marker Progress to view the number of submissions each marker has been assigned, and their progress in marking eg. 0/1. Within this window you can also choose to email the individual marker.
Access the full submission and feedback
Click on the double arrow icon next to a student’s name to show a detailed view of the submission.
In the detailed view you can:
- Choose View Attempt to access the student’s full paper.
- Choose Add Feedback to add your own feedback comments. (Reconciler comments are visible to students via My Marks)
- View a summary of first and second marker provisional marks and feedback comments. Use View Rubric to see how each marker has completed the marking rubric.
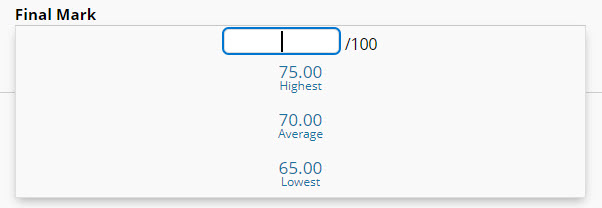
- Use the blue Final Marks field to enter an agreed mark.
Changing the default setting to release provisional marks
The default setting is that students will be able to see the provisional marker feedback comments, unless the reconciler chooses to deselect that setting. If your course team has decided that provisional feedback should not be released to students check out Reconciling Marks Part 2 for further guidance.

Selecting and choosing final marks
When reconciling marks you can choose the highest mark, lowest mark or average mark or choose to enter a bespoke value.
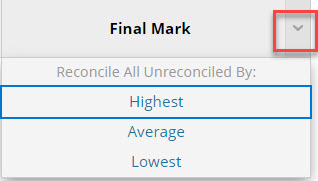
Bulk reconcile marks
If appropriate you can choose to reconcile marks for all unreconciled assignments. To do that click on the arrow next to Final Marks. Next select either, highest, average or lowest to apply that value to all unreconciled assignments.
Reconcile marks for individual assignments
To reconcile marks for an individual student either in the table view or full submission view click on the blue Final Mark field. Next select either the highest, average or lowest value or enter a bespoke value to save the agreed mark.