Delegated Marking: Troubleshooting Guide

This article takes a look at some of the common questions raised when staff are attempting to access or mark a Blackboard assignment where delegated marking has been enabled.
If staff report an issue you can check the guidance below in first instance. If all settings appear correct, please contact the eLearning Team for support. For staff who also need to reconcile (agree) final marks, check out our reconciler guides.
1. Check the marker is accessing the correct submission
Check that the marker is accessing the correct column (assignment) and cell (student row) in Gradecentre.
You can refer markers to this article: how to access and mark a Blackboard assignment.
2. Check that submissions are allocated correctly
Check that the marker has been allocated submissions via either All Submissions or Groups. To do that, follow the steps below:
- Ensure Edit Mode is switched ON within the Blackboard space.
- Edit the assignment, by clicking on the grey arrow next to the Blackboard assignment title and choosing Edit.
- Scroll down to the Marking section and open Marking Options.
- The Enable Delegated Marking checkbox should be ticked.
- Locate the relevant member of staff and check that either All Submissions or the correct marking Groups have been highlighted.
- If you make changes, ensure that you choose Submit to save the changes.
All Submissions
If All Submissions is selected, a marker can access all submissions for the assessment.

Groups
If a marker needs to focus on particular groups of students, then the relevant groups should be highlighted, in the dropdown list next to their name. A marker should be able to see all students who have been enrolled in the group, regardless of whether the student has submitted.
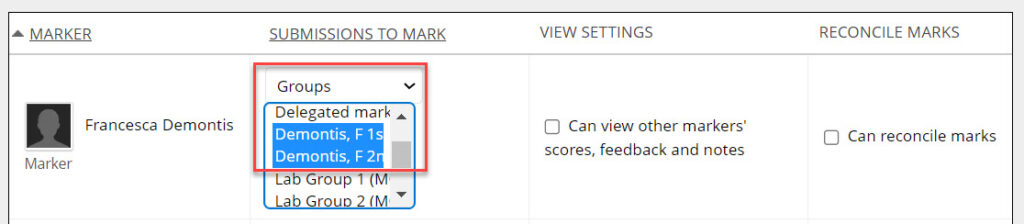
- If the correct marker groups are not highlighted, highlight the groups. To highlight multiple groups, you will need to hold down the shift key and click to select.
- Next, click Submit to save the assignment settings.
- Check with the marker, that they can now see the relevant groups.
3. Check that the correct students have been added to a marking group
To check which students have been allocated to a marking group, follow the steps below:
- Go to Control Panel>Users and Groups>Groups
- In the Groups page select the All Users tab.

- You should now see a list of users, next to each user will be a list of the groups they are enrolled on.
- Set the search fields to Last Name, Contains, then enter the user’s surname.
- If more than one student has the same surname, use the username to identify the correct student.
- If you need to add a student to a group, then hover your cursor over the groups listed next to the student. You should see a + Add Group link, click this and select the group you want to add the student to.

- Click Submit to apply the changes. You should now see the new group listed next to the student.
- IMPORTANT: After you add a student to a marking group, ensure you go back into the edit assignment settings (outlined in step 2 above). Click Submit, without making any changes to apply the updated group membership to the assignment.
4. Check Smart View settings
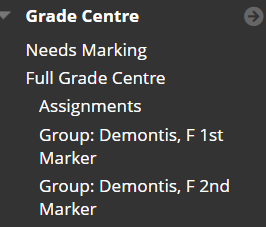
The smart view is a shortcut that displays only certain students in the Grade Centre.
To check smart view settings follow the steps below:
- Click on Grade Centre in the Control Panel on the left-hand menu to expand the list. Check if the smart view appears. (A smart view will typically show the surname and initial of a marker).
Check an existing smart group
If a smart group already exists, check that it is pointing towards the correct marking group. To do that, follow the steps below:
- Click on Full Grade Centre
- Click Manage on the top menu and select Smart Views

- You should see a list of smart views for the Blackboard space. Locate the smart view that you want to check.
- Next click on the grey arrow next to the smart view title and choose Edit.
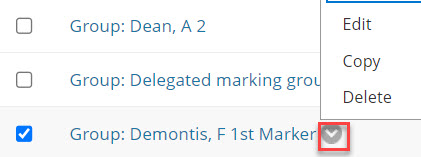
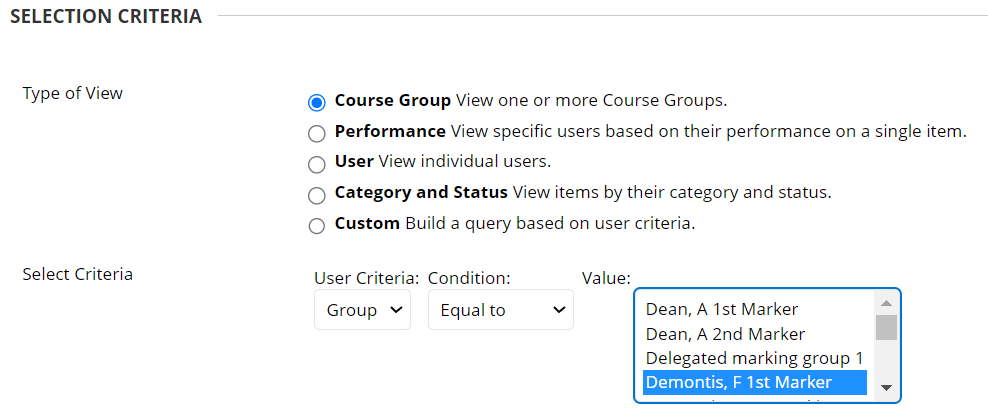
- In the select criteria section, check that the correct group is selected. If it is not, then click to highlight the group and then choose Submit to apply the changes.
Create a new smart group
If there is no smart view, you can set one up, to do that follow the steps below:
- Click on Full Grade Centre
- Click Manage on the top menu and select Smart Views
- Next, click Create Smart View
- Name the smart view
- Check the Add As Favourite box.
- In the Select Criteria section select the group you want the smart view to refer to and then choose Submit to save the changes.
- Refresh your browser and the smart view should now display on the left-hand menu.
5. Marking group is not visible / has disappeared
If a member of staff needs to access a specific group or groups of students for marking (rather than all submissions), then marking groups are created. The Availability of marking groups needs to be set as Yes in the group settings, so that they can be associated with the member of staff who is marking that group in the delegated marking settings.
If a groups Availability is set to No in group settings, then the association between the marker and group is broken. The group will disappear from the list of groups available in delegated marking settings and any smart views staff are using to access those groups will no longer work.
To check groups are set to available:
- Go to Course Management>Users and Groups.

- Check the available column – If No is selected then you will need to change the availability to Yes.
- For groups, which are part of a Group Set, you can change the availability of all groups in the set with one action. To do that click on the grey dropdown arrow next to the Group set name and choose Edit Group Set Properties.
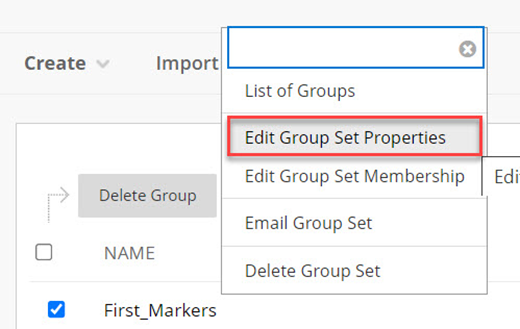
- Find the setting Group is visible to students and change the setting from No to Yes, then Submit to apply the changes.

- Once groups have been set to visible you will need to re-associate the marking groups with the correct markers. To do that follow the instructions in step 2 of this article (Check that submissions are allocated correctly)
6. Edit the assignment
If everything is as it should be in the settings, try the following steps below to ensure that all settings are up to date.
- Ensure Edit Mode is switched ON within the Blackboard space.
- Edit the assignment, by clicking on the grey arrow next to the Blackboard assignment title and choosing Edit.
- Do not make changes to the assignment settings, just click Submit.
Taking these steps ensures that all settings are updated (in case this has not been done after group members have been changed).
7. Feedback error message
If a marker is unable to save their feedback and gets an error similar to “Failed to parse multipart servlet request; nested exception is…”.
Refer the marker the article: Blackboard Assignments with Delegated Marking – error when submitting mark.