For larger cohorts of students, it can be helpful to set up marking groups, making your marking and moderation processes smoother. For Cadmus assignments, marking groups are set up in Cadmus, rather than in Canvas.
You can also add students to groups by uploading a spreadsheet into Cadmus. Guidance on how to do this can be found here.

Groups set up in Cadmus do not feed through to Canvas or Canvas gradebook. Cadmus marking groups are used to filter students.
Markers must select one student from their Cadmus marking group, mark this submission in Canvas Speedgrader, then go back to Cadmus marking groups to select the next submission to mark.
If you try to cycle through submissions in Canvas gradebook, you will be presented will all student submissions rather than just the ones assigned to your marking group.
Sync Canvas enrolments with Cadmus
Before setting up groups, we recommend syncing your Cadmus class list with your Canvas course enrolments, so the names of all the students enrolled on your course appear in the Cadmus class list. You can then create new marking groups individually.

You can sync your class list multiple times throughout the assessment to ensure any withdrawn or recently enrolled students are always updated in the Cadmus class list.
To sync the class list:
- In the Cadmus interface, go to the Progress page.
- Click Sync LMS.
- Click Sync class list:
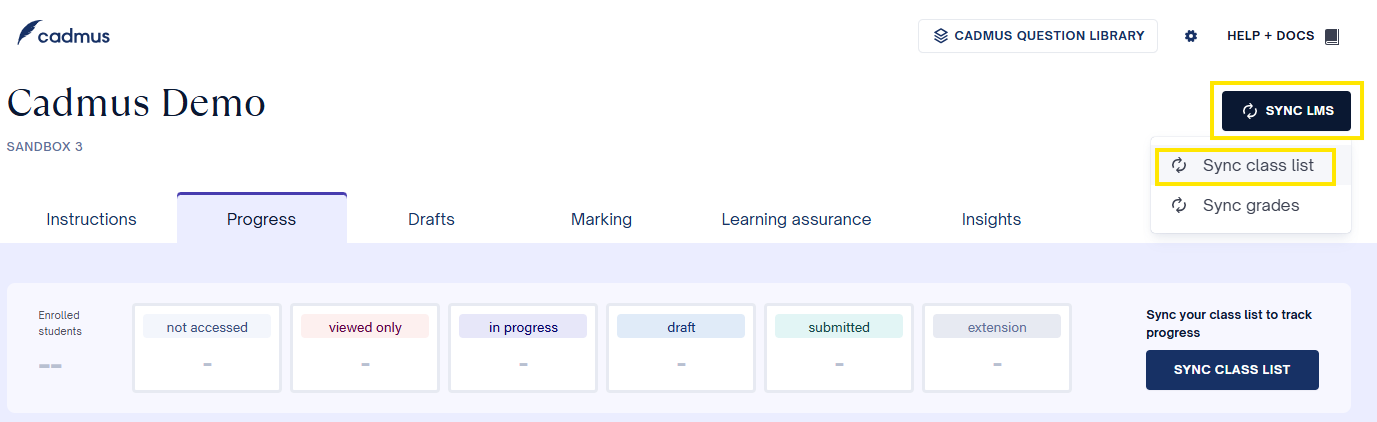
- Your Cadmus class list will update to show all students enrolled in your Canvas course.
Create a new marking group
To create a new marking group in Cadmus:
- Within the Cadmus interface, on the Instructions page, in the Marking Groups section, click Set Up:

- Click Create new group or use the Import a CSV or ZIP option if you would prefer to upload enrolments in bulk via a spreadsheet.
- If you create a new group, add a name for the group.
- Optional: Using the Randomly assign students to this group is a quicker way to create groups for marking but only use this option if you are happy for students to be randomly allocated to a marking group. If you have pre-defined/determined marking groups, then ignore this option.
- Click Create group to confirm.
- Repeat the above process for each marking group that you need to create
When creating a new marking group in Cadmus, ignore the Sync Canvas sections option, as we do not currently use Canvas sections at UoM.
Adding Markers to Groups
To add your Markers to your created groups, they would first need to access Cadmus through the Cadmus assignment link that you have created in Canvas. This is to ensure that the names of any markers are synced with Cadmus.
If markers have not yet accessed Cadmus via your assignment link, you can still create your groups, but they would have an unassigned marker. Once all markers have accessed Cadmus you can then rename the groups to reflect the Markers’ names.
Add students to marking groups
Once a group has been created, you can add and remove students directly from the Cadmus class list.
To add or reallocate students to a group:
- From the class list on the Progress page, select the students you would like to add to a group.
- Click Marking group.
- Select the group you would like to add the students to (you can also create a new group from here if needed):
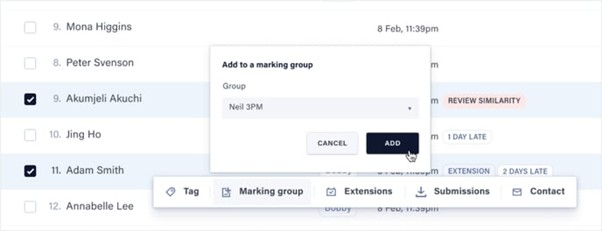
- Click Add to confirm and add the selected students to the marking group.
- Repeat the above process for each marking group.
Filter the class list by marking group
Once you have set up grading groups within Cadmus, you can easily filter the class list by group name.
To filter the class list by group name:
- From the Progress, Finals, or Drafts tab, select Marking group in the filter menu.
- Select the group you want to filter by.
You can also sort students in order of marking group by clicking on the Marking group header in the class list.