Groups can be a useful tool for sorting students and creating joint spaces in which they can collaborate on work – such as for group projects. To create groups in Canvas, first a group set must be created. Then groups are created within the set (e.g., teams for a group project). There are different types of groups that can be made depending on your needs: manual groups, random groups or self-enrol groups.

Students are usually notified when they’re added to a group, and students can see the names of everyone in their group. If you need to organise students anonymously, such as for setting flexible deadlines related to DASS requirements, use Differentiation Tags instead. Tags keep student identities private while allowing you to tailor content and deadlines discreetly.
Students access their groups through the Canvas Global Navigation menu, which displays every group they’re part of across all their enrolled courses. To help students quickly identify the relevant group, it’s strongly recommended to include the course code at the beginning of each group name. For example, instead of “Group 1” use something like “PHYS123456 Group Presentation – Team A“.
Creating Manual Groups
This is used for manually assigning specific students to specific groups.
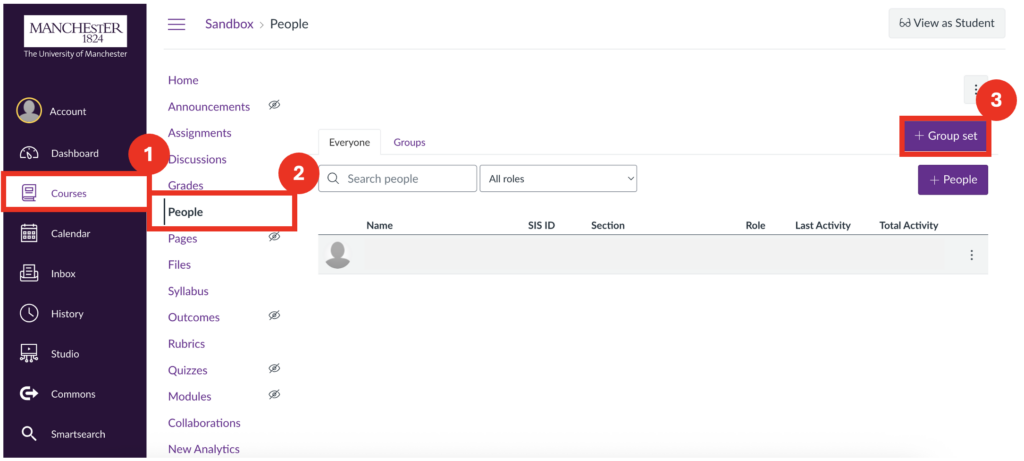
Step 1: Navigate to the relevant course.
Step 2: From the course menu, click People.
Step 3: Click the + Group Set button to create your group set.
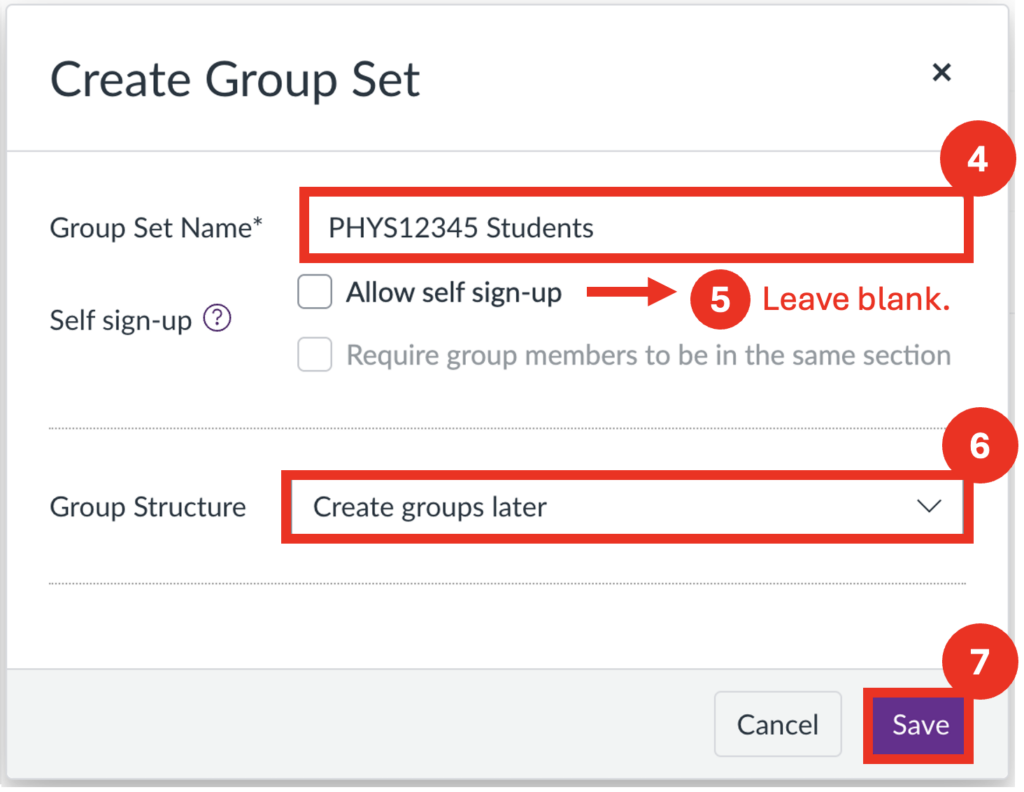
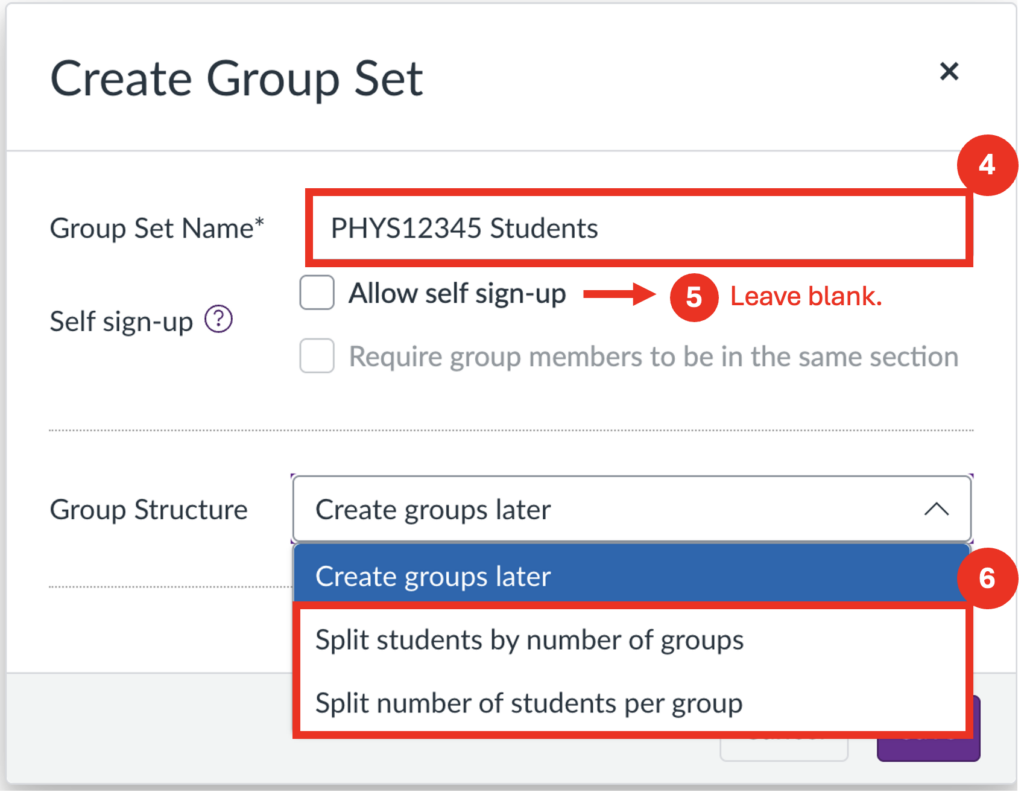
Step 4: Give your group set a specific and meaningful name. E.g., something like “PHYS12345 Coursework 1A” works better than just “Group 1” or “Coursework”.
Step 5: For manual groups, self sign-up isn’t required – leave this box unselected.
Step 6: Choose to “create groups later” (i.e., manually).
Step 7: Click Save.
Step 8: To create your individual groups within the group set, click the + Group button.
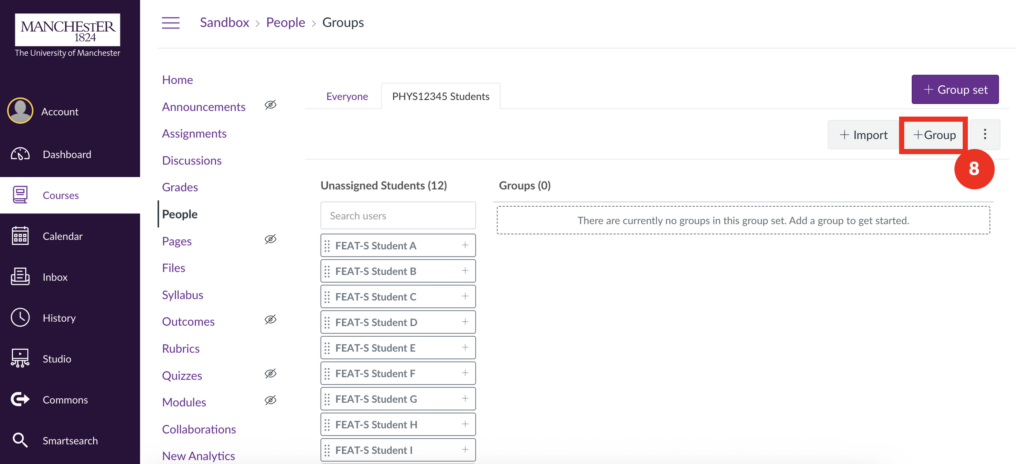
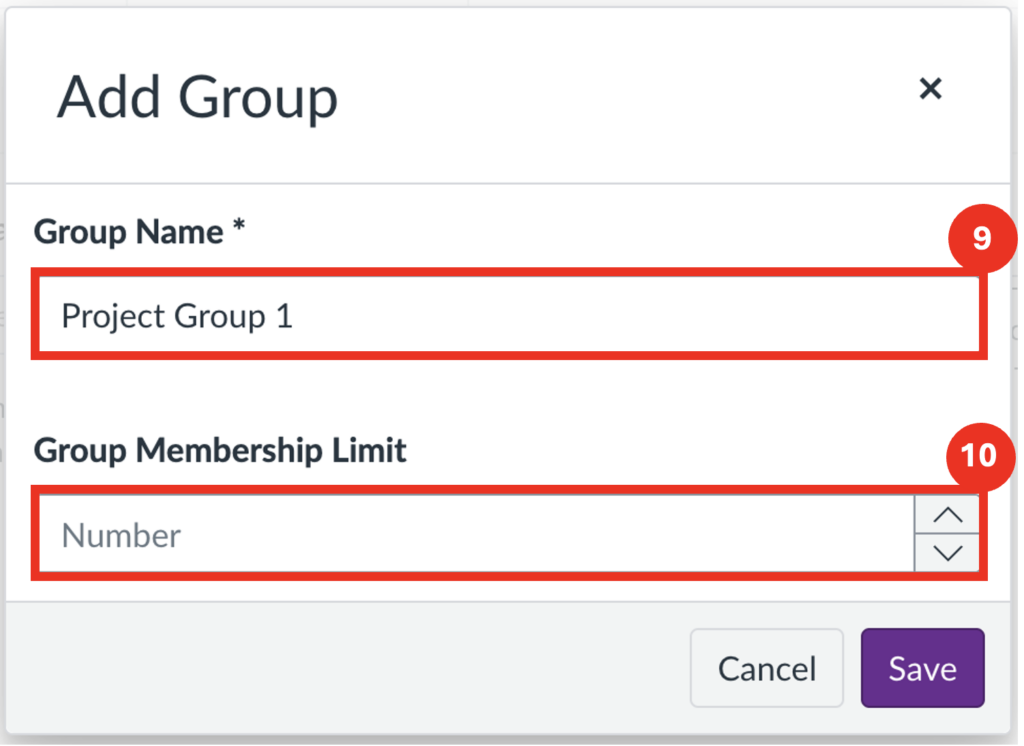
Step 9: In the dialog box, specify your group name – this name will be visible to the group members, so should be specific and relevant.
Step 10: Set your group membership limit (or leave it blank for no limit).
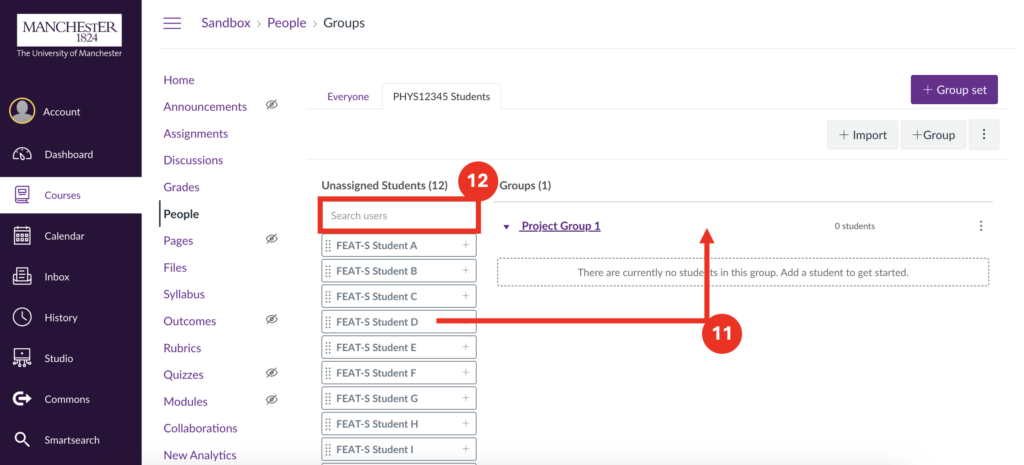
Step 11: To add students to the group, drag and drop their names across from the unassigned students list into their respective group.
Step 12: The search box allows you to find specific users in the course, if working with a long list.
Creating Random Groups
This is used when students do not need to be specifically assigned, and it does not matter which students end up in which group.
Step 1: Navigate to the relevant course.
Step 2: From the course navigation menu, click People.
Step 3: Click the + Group Set button to create your group set.

Step 4: Give your group set a specific and meaningful name. E.g., something like “PHYS12345 Coursework 1A” works better than just “Group 1” or “Coursework”.
Step 5: For random groups, self sign-up isn’t required – leave this box unselected.
Step 6: Under group structure there are 2 options for generating random groups: “Split students by number of groups” OR “Split number of students per group”. Choose the preferred option.

“Split students by number of groups” allows you to specify the number of groups you would like, and Canvas will equally divide the students between them.
“Split number of students per group” allows you to specify how many students you would like in each group, and Canvas will generate the required number of groups to achieve this.
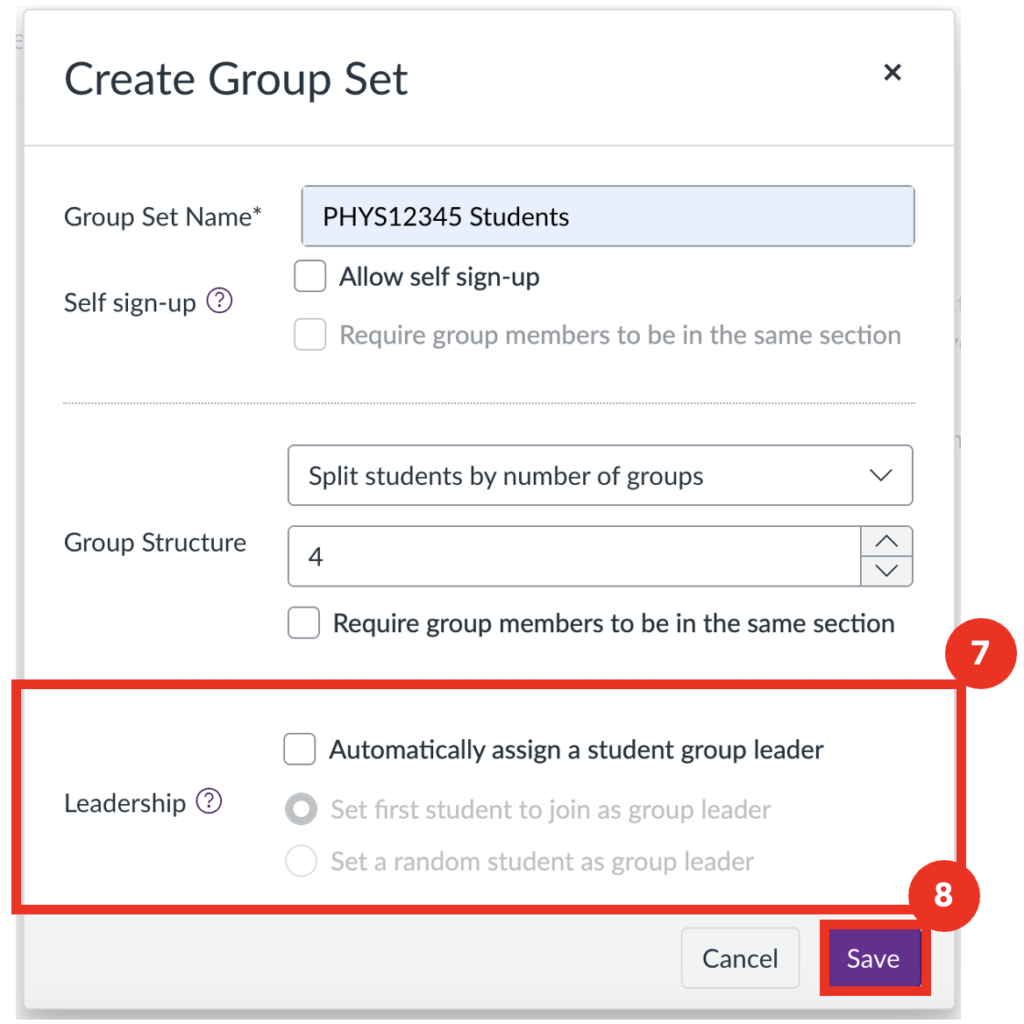
Step 7: An option to “Automatically assign a group leader” will appear after selecting one of these options. A group leader will be able to change the name of their group and add/remove group members. If left unchecked no group leader will be assigned.
Step 8: Click Save to generate your groups.
Group leaders will not be specifically notified that they have been made group leader, and will have to enter the Canvas group to discover this. The addition of a group leader has no bearing on group assignment submission (i.e. even with a group leader specified, anyone within the group can still submit the assignment).
Step 9: To edit group names and membership limit, select the 3 dots on the right-hand side of any group and click Edit.
Creating Self-Enrol Groups
This is used when you would like students to choose their own groups (e.g., when picking their own project from a given list).
Since students can freely move between groups until the group set is locked, it’s recommended to establish a clear deadline for sign-up, and then lock the groups at that point. There is currently no Canvas setting to do this automatically, so self sign-up must be disabled manually.
IMPORTANT: Students access self-sign-up groups on the People tab of the course. If the People tab is hidden from student view or unavailable, students will not be able to join groups. See Step 10 for further guidance.
Step 1: Navigate to the relevant course.
Step 2: From the course navigation menu, open “People”.
Step 3: Click the “+ Group Set” button to create your group set.

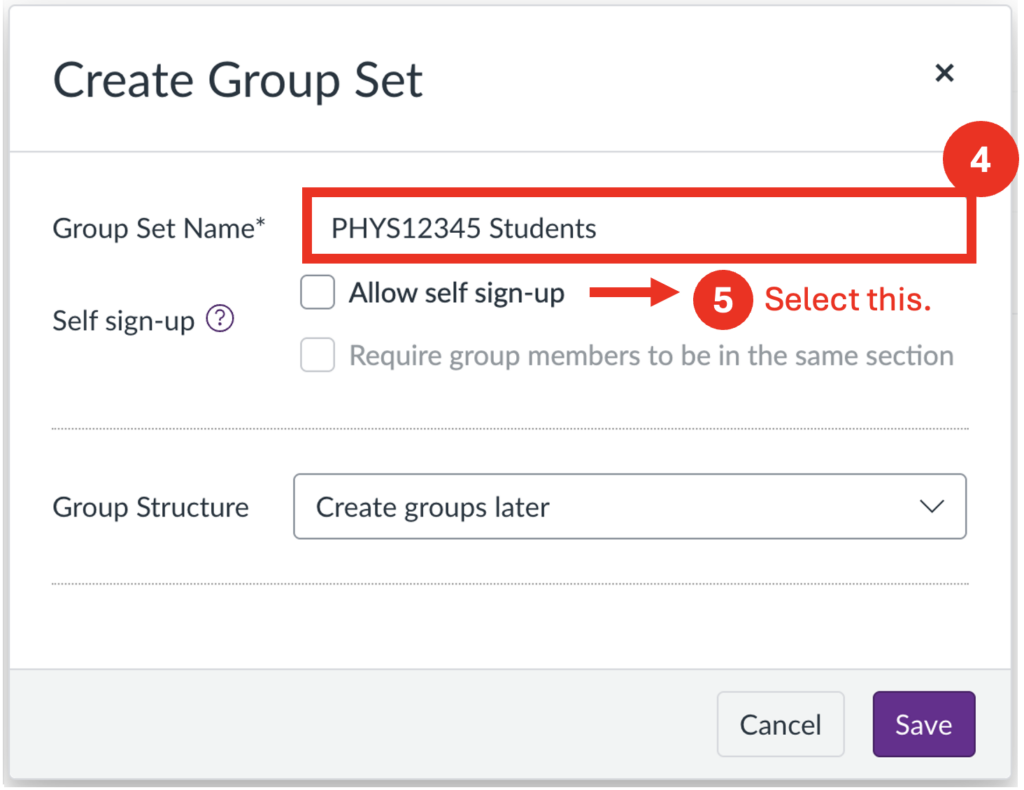
Step 4: Give your group set a meaningful name.
Step 5: Here self sign-up is required, and should therefore be selected.
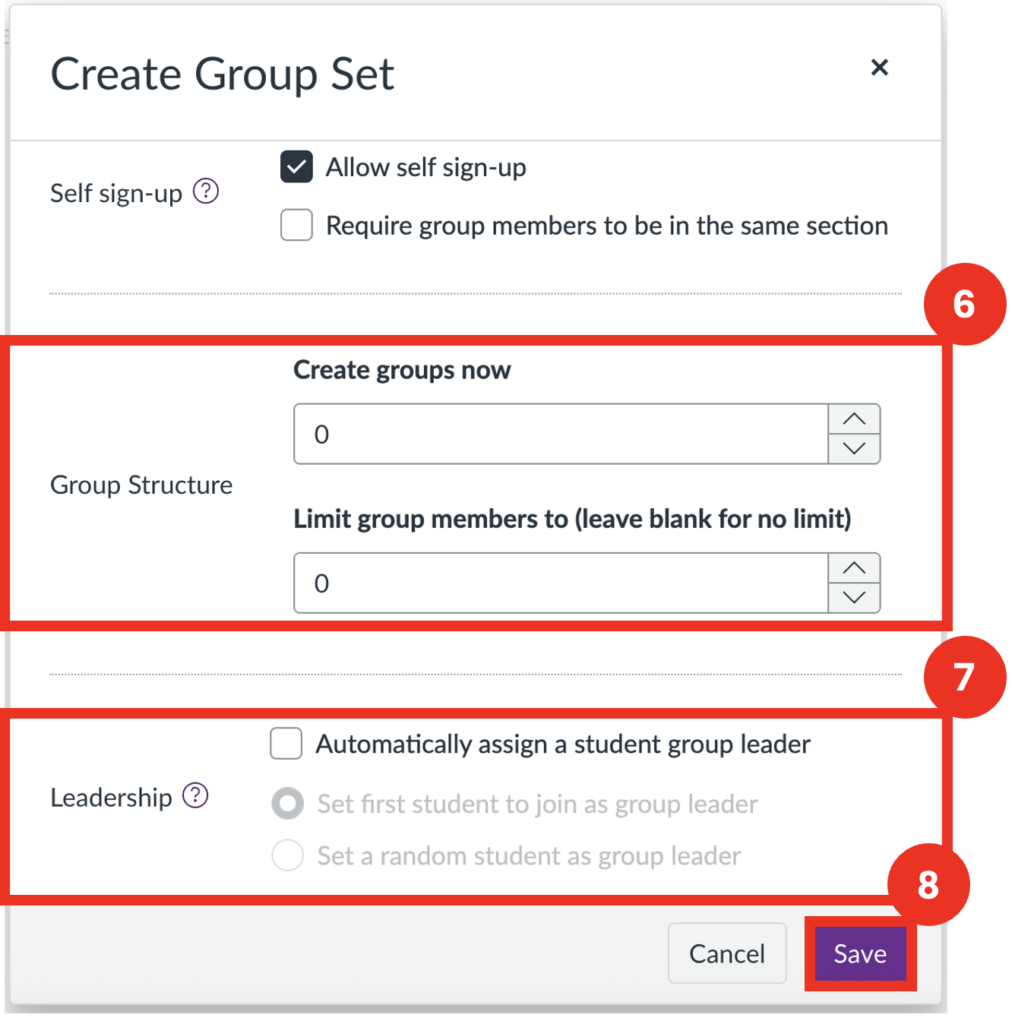
Step 6: Upon selection of “Allow self sign-up”, more drop-downs will appear. Select the number of groups required under “Create groups now”, and add a membership limit (or leave blank for none).
Step 7: There will be an option to “Automatically assign a group leader”. A group leader will be able to change the name of their group and add/remove group members. If left unchecked no group leader will be assigned.
Step 8: Click save to generate your groups.
Group leaders will not be specifically notified that they have been made group leader, and will have to enter the Canvas group to discover this. The addition of a group leader has no bearing on group assignment submission (i.e., even with a group leader specified, anyone within the group can still submit the assignment).
Step 9: To edit individual group names and settings, select the 3 dots on the right-hand side of any group and click Edit.

Step 10: Enabling the People Tab for Group Sign-Up
To allow students to self-sign up for groups, you’ll need to make the People tab visible.
- From the course menu, click Settings.
- Select the Navigation tab.
- Locate the People item in the lower section of the page.
- Drag it to the upper section to enable it, or click the three dots next to People and select Enable.
- Click Save to apply the changes.
Step 11: Protecting Student Privacy
To help safeguard student privacy, it’s recommended to hide section information from view on the People page.
- Navigate to Settings in the course menu.
- Locate and select the option “Hide sections on the People page from students”.
- Click Update Course Details to save your changes.
Note: This setting is only available if your course includes more than one section.
Importing Groups/Creating Groups in Bulk
Where you want to assign students to specific groups using already pre-designed groups. This can be useful for assigning students on a larger scale.
Step 1: Navigate to the relevant course.
Step 2: From the course navigation menu, open “People”.
Step 3: Click the “+ Group Set” button to create your group set.


Step 4: Give your group set a meaningful name.
Step 5: For importing groups, you should create a manual set-up. Therefore self sign-up isn’t required – leave this box unselected.
Step 6: Choose to “create groups later” (aka manually).
Step 7: Click save.
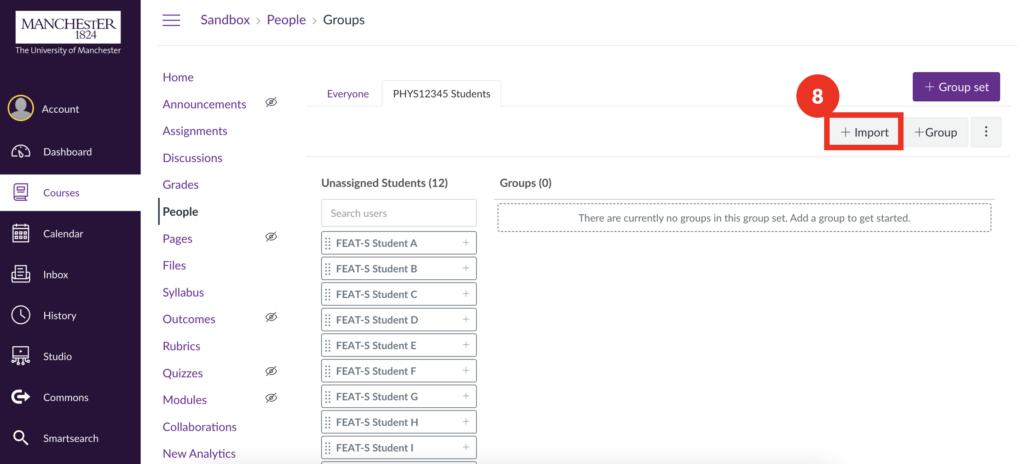
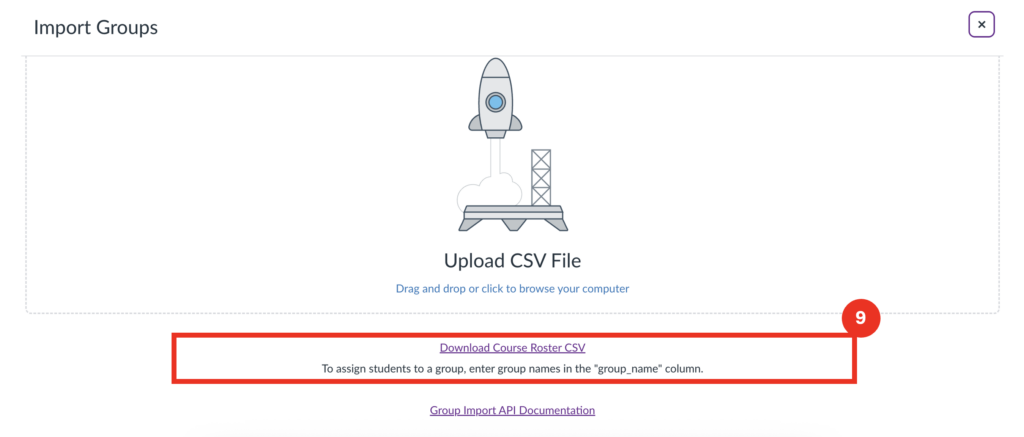
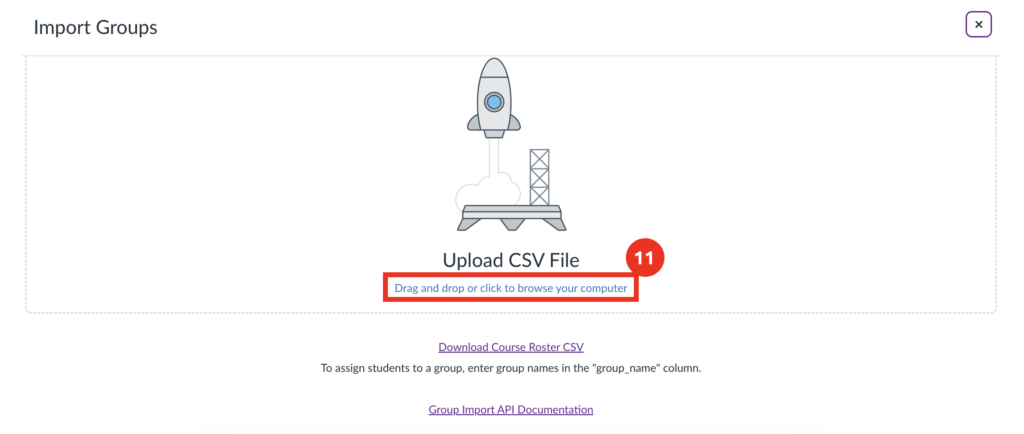
Step 8: Click “+ Import” in the top right corner.
Step 9: Download the Course Roster CSV linked on the page. Alternatively, you can download our own template here: Group Import Template.csv.
In order to edit the Group Import Template as a csv file, you will need to download your own copy of the file and edit it in desktop excel, not in browser. Also ensure that when saving the file it is saved in the .csv format, and not in .xlsx.
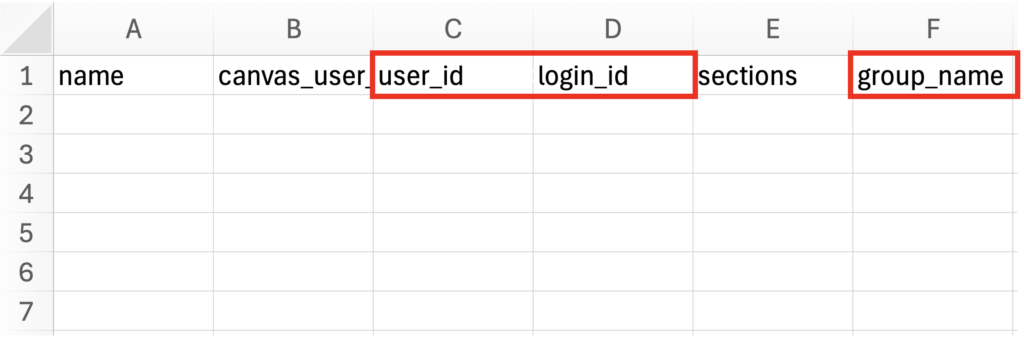
Step 10: The tables (pictured below), should be filled in with each student in a new row. The two required columns are:
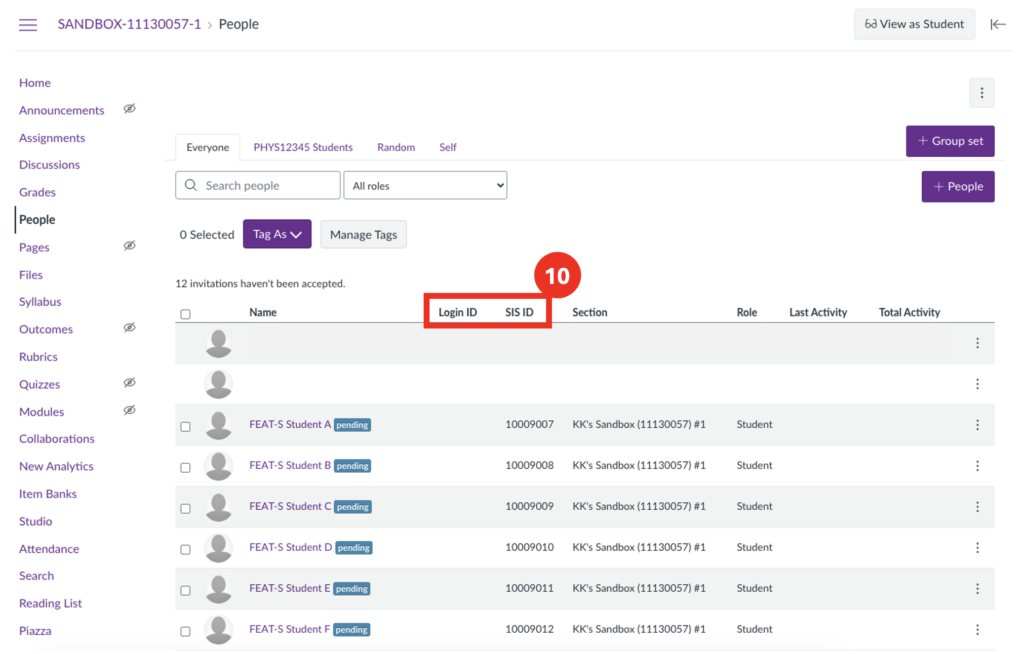
- user_id OR login_id – these are user identifiers, and only one is required. User_ID can also be referred to as SIS ID. Both can be found on the “People” page of a course (Image 3 below).
- group_name – where you type the name of the group you would like the student to belong to.
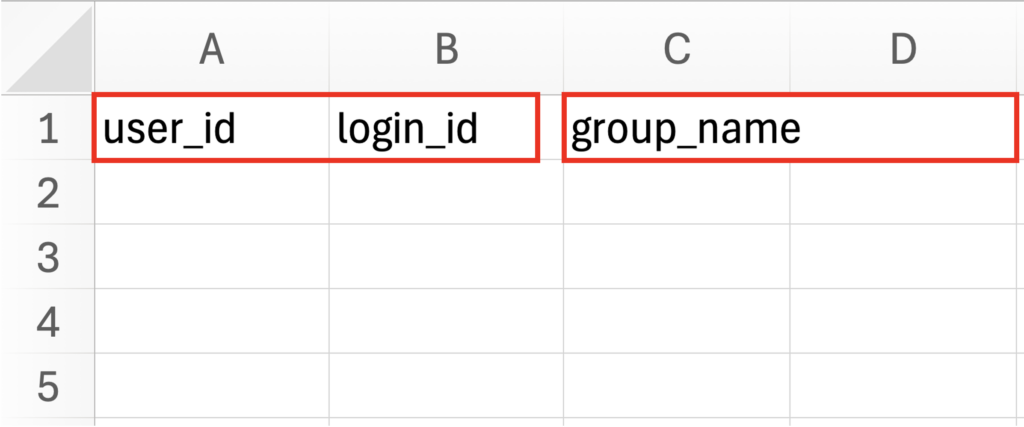
Filling in the other columns of the Canvas Course Roster CSV (Image 1) is not necessary. In the downloadable template (Image 2) only the 3 main columns have been included, but as before, only user_id or login_id is required in addition to group_name.
Step 11: Re-upload your file on the import page either by dragging and dropping, or by browsing your computer and selecting the file. Once processed, the changes you’ve made will pass over to the live groups.
Editing Groups and Group Sets
Once your groups and group sets have been created they can also be edited.
Editing Groups
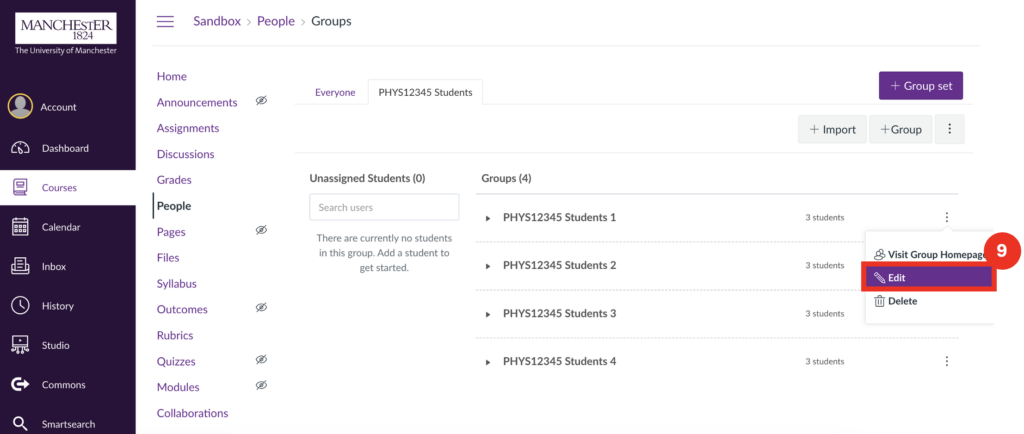
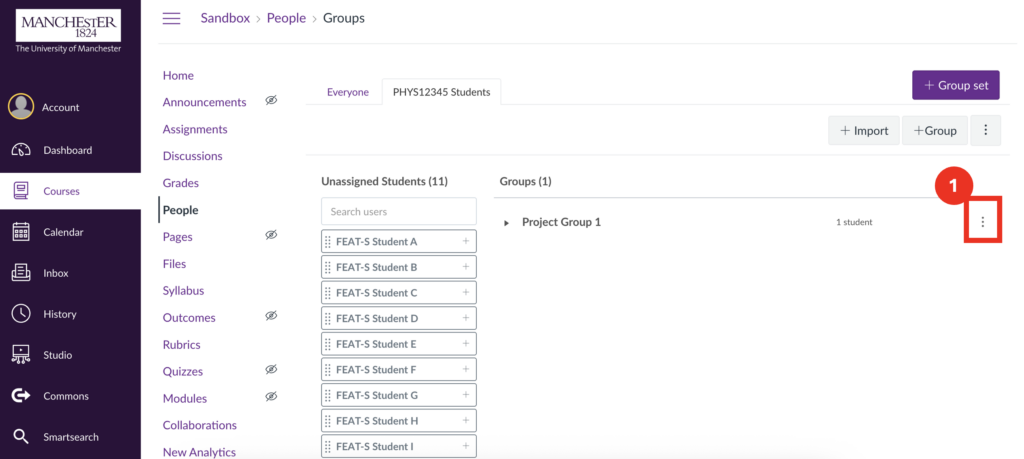
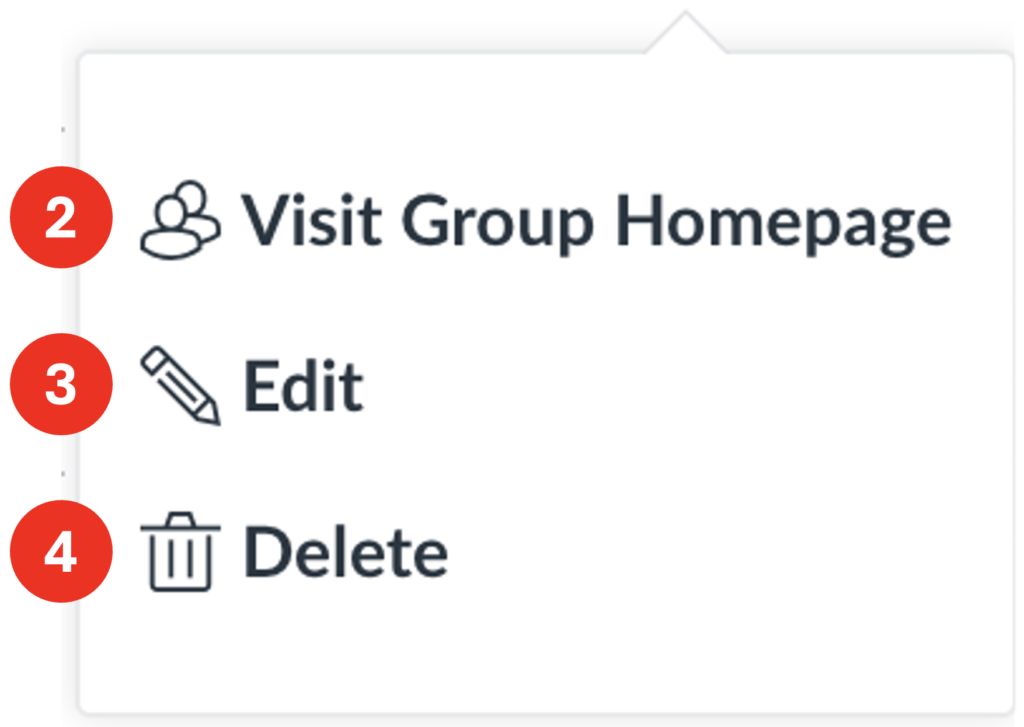
Step 1: Select the 3 dots on the right-hand side of any group to edit that specific group.
3 options will appear on the drop-down:
2. Visit Group Homepage – takes you to the group page, where you can view group members, files, discussions, pages, collaborations and make announcements.
3. Edit – allows you to change the Group Name and Group Membership Limit.
4. Delete – deletes that group. All participants will be returned to the “Unassigned” tab.
Editing Group Sets
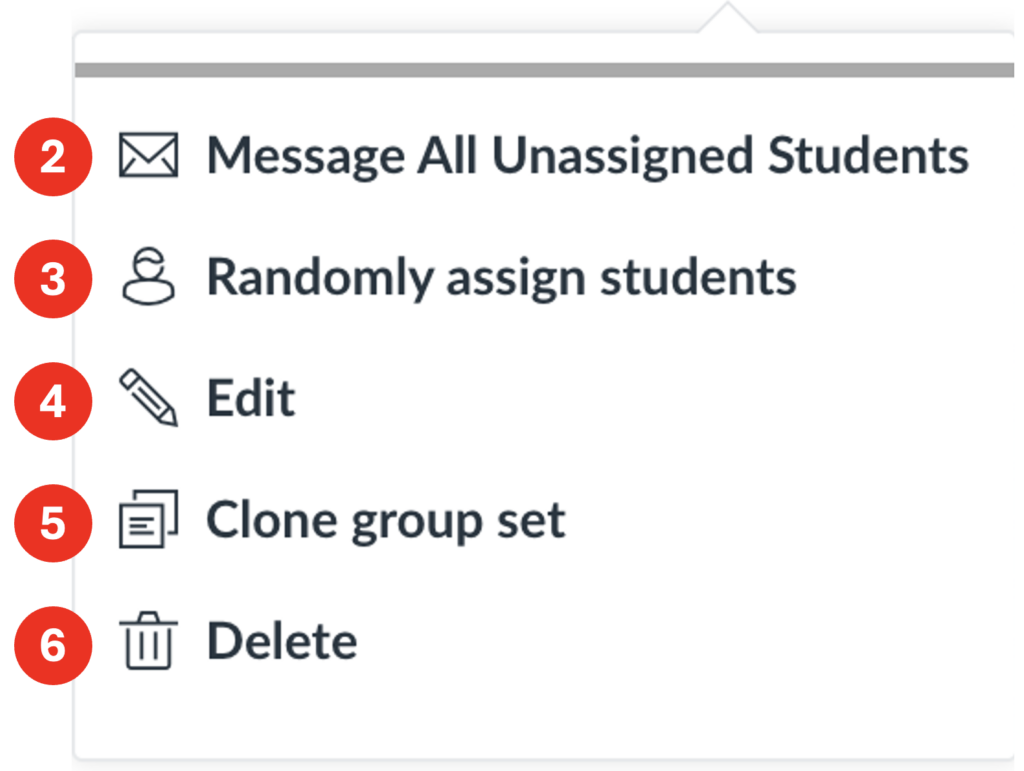
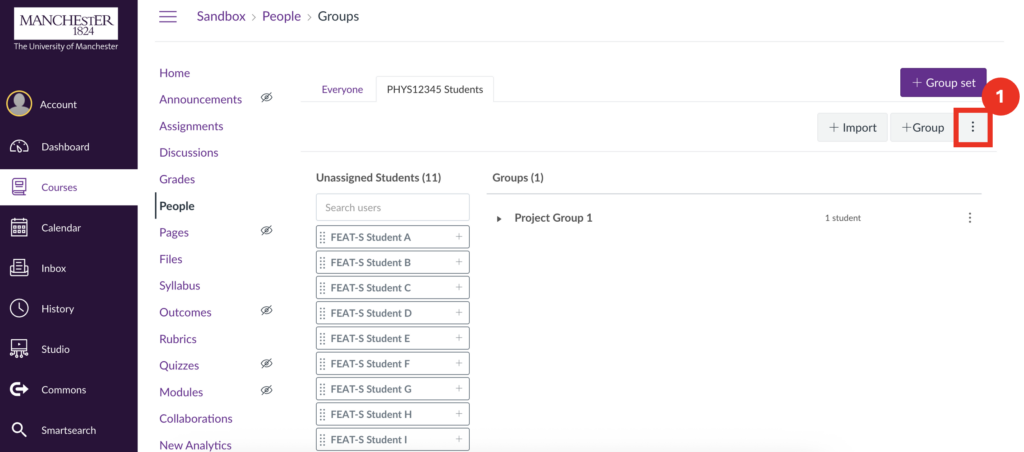
Step 1: Select the 3 dots on the top right-hand side, directly underneath the “+ Group Set” button.
A drop-down menu will appear with the following options:
2. Message All Unassigned Students – sends a canvas message to all remaining unassigned students. This will not appear if all students have already been assigned.
3. Randomly Assign Students – will automatically assign all remaining unassigned students as evenly as possible among the existing groups. This will not appear if all students have already been assigned.
4. Edit – allows you to edit group name, membership limit, and leadership settings. Here you can also disable/enable self sign-up.
5. Clone group set – creates a duplicate of that group.
6. Delete – deletes the group set.