Canvas Essentials: Rubrics

This article takes a look at some frequently asked questions concerning using rubrics in Canvas.

Below are general differences about working with rubrics in Canvas.

  • Rubric types: Canvas does not support weighted rubrics. You could choose to convert your rubric to a points based rubric. Canvas Rubrics: Key differences and tips includes a section on Adapting Weighted Rubrics for Canvas.
  • Adding Rubrics to assignments: The option to attach a rubric to your assignment will only appear once you have created your assignment.
  • Rubric visibility: Once you attach a rubric to an assignment and publish the assignment, the rubric will be visible to students before they submit work. If you do not wish students to view the rubric, add the rubric after the submission deadline.

Blackboard rubrics will be imported. However, Turnitin Rubrics will not be imported and will need to be recreated from scratch. To review rubrics that have been imported to Canvas follow the steps below:

  • Access your Migrated space and click the Rubrics link in the the course navigation menu on the left.
  • Locate the relevant rubric and click the vertical ellipsis in the Actions column, then select Edit.
  • The rubric will launch in Edit mode where you can both Preview the rubric and Edit it.

Rubrics can easily be copied between Canvas units, using the steps below:

  • Navigate to the course unit that contains the rubric you want to copy.
  • Open the Rubrics menu and locate the relevant rubric.
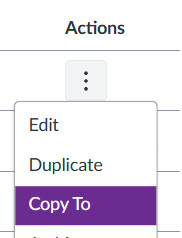
  • In the Actions column click on the vertical ellipsis next to the relevant rubric and select Copy To.
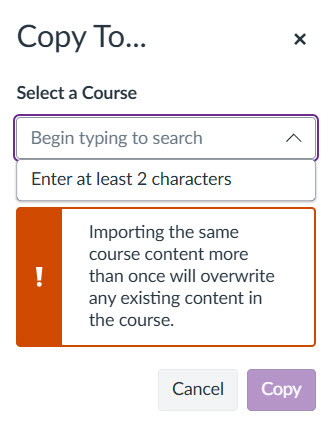
  • Next in the Copy To window search for and select the course you want to copy the rubric to, then click Copy.
  • Finally, navigate to the space you have copied the rubric to and open the Rubrics menu, to check that you can see the rubric.

Rubrics can be created and managed via the Rubrics menu in your Canvas course space.

Rubrics settings

To build a rubric from scratch in Canvas, you need to name your rubric, select appropriate settings and also draft criteria, which will form the basis of your rubric.

  1. Type: Scale or Written Feedback. A Scale rubric allows you to use either fixed points or set a points range for each rating (rubric cell). A Written Feedback rubric is designed to provide qualitative feedback, and does not support point ranges. To create a rubric which is similar to a Turnitin Grading form, use a Written Feedback rubric, but leave the rating descriptions fields blank.
  2. Rating Order (High < Low): Determines the order that the ratings appear in your rubric. For example, Distinction to Fail versus Fail to Distinction.
  3. Scoring: You can choose Scored or Unscored for both Scale and Written Feedback rubrics. This simply determines whether or not the points for each criteria will be displayed to staff and students when the rubric is applied. To verify that points have been removed on an ‘Unscored’ rubric, locate the rubric via the Rubrics menu, then under Actions (…) choose Edit and then Preview Rubric.
  4. Use this rubric for assignment grading: To have your rubric automatically calculate and apply the final grade for an assignment, you must enable the Use this rubric for assignment grading setting. If this setting is not enabled, the rubric score will not transfer to the grade field in SpeedGrader and a marker will need to manually enter the grade.

Drafting rubric criteria

By default, for both Scale and Written Feedback rubrics, a new criterion will be marked out of 4 points, with standardised rating names.

To customise criteria you can:

  1. Enter Criteria Name and Description. E.g., Knowledge and Understanding; adding criteria description is optional.
  2. Change the Rating Names to fit your rubric. E.g., Excellent, Very Good, Good, Pass, Fail.
  3. Enter a Rating Description. These are the descriptions which will appear in each cell within your rubric.
  4. Hover your mouse to reveal a + icon to add new ratings.
  5. Drag and drop ratings to a new position within your criterion.
  6. Click the trash can icon to delete any ratings you don’t need.
  7. Change the Points value.
  8. Optional: In a Scaled rubric, if you wish to apply a points range to each rating, we recommend entering the maximum points next to each rating before ticking the Enable Range box.

If you are building a new rubric from scratch, you may find it quicker to draft the first criterion, set up with your rating headings (e.g., Excellent, Good, Pass), and then duplicate that criterion. This will avoid you needing to edit the default rating names for each new criterion. Once you have the desired number of criteria, you can then edit each one to add rating points and descriptions.

Editing an existing rubric is easy. Open the Rubric menu, locate the rubric and click on the vertical ellipsis in the Actions column, then choose Edit.

  1. Use the pencil icon to edit a criterion.
  2. Use the +/square icon to duplicate a criterion. This will create a copy of the criterion than you can rename, edit and save.
  3. Use the trash can icon to delete a criterion.