Planning your blended course’s structure, content and activities

To optimise your course unit for online/blended delivery, we advise that you put together a plan for the structure of the content and activities. This will enable you to:
- Lay out what you need to do and what support you may need.
- Define the way you should lay out the Blackboard site for your course. Having a clear layout organised by week will greatly help students know what is expected of them.
- Modify your plan into a checklist for students informing them of what is expected of them.
- Get recommendations and support based on your plan.
The advice we have below is good practice, it’s unlikely that you will implement all of these changes but it’s important to keep the principles in mind when planning your course. Your Discipline Head of Education and Teaching College will set out the specific minimum requirements for your online material.
We are more than happy to provide feedback on your course plans and discuss ideas with you; just email FSEteachingcollege@manchester.ac.uk.
You can find the planning spreadsheet referenced on this page here: planning spreadsheet (.xls, 32kb). First we’ll show an example of how a completed week in the plan looks. We’ll then look at the elements involved in structuring a blended course. Finally, there’s a section which gives additional guidance on filling out each column in the planning spreadsheet.
Weekly and activity planning example
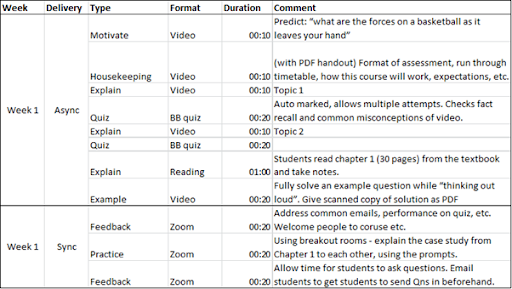
Here is an example of how your plan should look in the weekly planning and activity planning tabs in the planning spreadsheet (.xls, 32kb).
Weekly plan
First, the high-level description of each week’s content and learning outcomes. You should have a folder in your Course Content area in Blackboard for each week’s content. The text here should then be used as the description text on these folders.
| Week 1 | Welcome to week 1. By the end of this week you should be able to describe the main components involved in the transport of electrical energy from source to the end users. You should then be able to link their basic design of these to the main challenges of bulk power transfer in a synchronised system. |
Activity plan
And an example of a course’s activities broken down by week:
How to structure a blended course
Course level structure
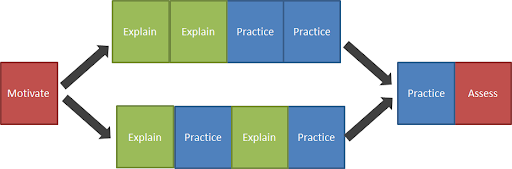
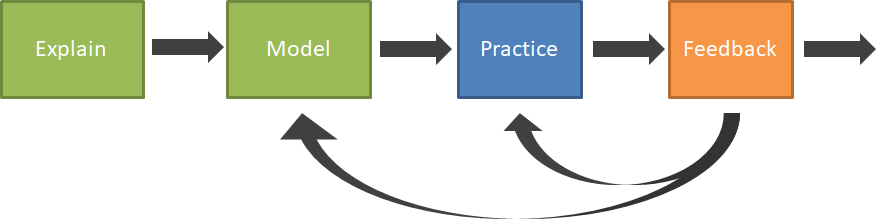
At the highest level you should start a course by building motivation; you should explain before you practice; and you should practice before you assess. Though you might need multiple explanations before you can practice; and you might need to get students to practice lots of simpler tasks before combining them into something ready for assessment. Students should spend most of their time practising relevant things.
Motivate – this aims to get students excited about the topic, to believe it is feasible and valuable to learn it, and clarify your expectations around their learning.
Explain – this aims to get students to remember or conceptual understand something – your classic lecture is an example of this.
Practice – this aims to get students doing a thing written in the learning outcomes, or practicing a subskill that leads on to the learning outcome.
Assess – this is to see how well the student is able to perform the learning outcomes.
For most people, who are used to teaching on-campus courses, this generally means spending less time on explanations (lectures) and more on practice, and starting the practice tasks earlier than you normally would.
Structuring activities for effective feedback
For any activities, whether it is an explanatory video or group practice, you should ideally design them so that you can see how students are performing, e.g. how many believe that learning the topic is valuable and feasible; how many understand the topic; how many can do the practice activity correctly, etc. To do this there needs to be a back-and-forth between students and lecturer. This leads to a general structure for any activity:
Step | Example 1 (Explain) | Example 2 (Practice) |
1. Student does a thing | Student watches an explanatory video | Student completes a question sheet |
2. You get information about how they did | They complete a quiz, you get the scores per question | They submit workings out to Blackboard |
3. You tell them what to try next, based on how they did (either “try this next” or “you’re on the right lines, keep going”) | They can immediately see their score on the quiz. Plus you go back through the hard material in a synchronous tutorial session (e.g. Zoom). | You leave short comments on what material to go back over, and you reteach some material in a synchronous tutorial session (e.g. Zoom). |
4. Student puts feedback into practice (ideally straight away). | They can re-watch the video if they score badly on the quiz and they can ask questions in the tutorial. | |
5. You see if the feedback helped. | The quizzes for the next lecture contain a few of the harder questions form this material to see if the students have actually mastered it. |
The only way you can really tell if you are giving effective feedback is if you get all the way to step 5, where you see if a student has actually improved based upon the feedback you have given them.
Some ideas on how to motivate students
Be enthusiastic about your own material!
Show something surprising (You Can Hear The Difference Between Hot and Cold Water).
Get them to make a prediction (that you know is likely to be wrong because they don’t know the material yet; Muller – The key to effective educational science videos).
Show the fun/exciting bits of what this skill leads to, e.g. if teaching the maths of inverse kinematics show robots.
Get an industry speaker in to show how important this is to them.
To structure a good explanation (do these things in this order):
-
Make sure students want to learn (motivation).
-
Remind them what they already know (e.g. through a test or recap).
-
Explain (in a short video, 5-15mins, ideally under 10).
-
Test their recall of the new material in a way that gives you immediate (ideally automated) feedback so students can rewatch the video and you can re-teach the parts you need.
As you are probably breaking one lecture into multiple videos you might need to have a few explanatory videos and recall tests. If this is the case, it might be good to break things up by adding in a short practice activity.

To structure a good practice activity (do these things in this order):
-
Make sure you have explained any background material first (using the guidance above).
-
Then show how to do it properly by adding a fully worked (solved) example for each major practice activity.
-
Provide clear guidance on what you want them to do and how long it should take.
-
Design the task so that you get feedback on how the students did.
-
Use this information to either re-teach something, go through another example (model answer), or come up with a modified practice activity so students can put their feedback into practice.
Other pieces to keep in mind
Encourage interaction between students, both in the form of specific activities and informal peer teaching and support.
For students to get the most out of feedback, or just to learn well generally, it is really useful if you show and teach them how to evaluate their own work by you showing examples of how you do it.
Example
| Video: example structure of a blended course (forthcoming) |
Guidance on filling out your Activity Plan
Here you can find explanations of the content that should be entered into each column of the Activity Planning tab in the planning spreadsheet.
Week
As you can see the activity plan is broken down by week. While this might not be the way you are used to organising your online material (e.g. in Blackboard) it will greatly help the students with clarity around what is expected of them, and makes it clear to them if they are falling behind.
Don’t worry too much if you fall out of sync when actually delivering your material, just make it clear to students where in the material you are currently at and what is expected of them in any week (this can be part of your weekly email).
You might have labs that run with different groups of students in different weeks (e.g. group A does this in week 2, group B does the lab in week 3). If this is the case then it might make sense to have an additional ‘week’ that is just called ‘lab 1’, but make sure you remind students when they are expected to do this.
Delivery Mode
- Async – something that the student can complete in their own time (i.e. it’s not scheduled on their timetable).
- Sync – something that involves student and lecturer (or GTA) interacting in real time (e.g. over a video link).
You will want a mix of both types of activity. Students will greatly benefit from the ability to ask questions and have them answered in real-time, even though many will not take the opportunity you should offer it.
Lecture material is best delivered asynchronously, as a pre-recorded video (e.g. flipped learning), but this is best when combined with:
- An activity to help students cement the knowledge (e.g. a quiz), and
- A synchronous activity where you revisit the parts of the material students struggled on, and have an opportunity for students to ask questions.
Type
The type of activity you are asking the student to do. See the video on how to structure a blended learning course for a more detailed description of these and how they can be sequenced to help students learn. Not every task will neatly fit into just one of these categories – try to select the one that fits most closely.
- Motivate – show something surprising or unusual, show a gap in knowledge, and/or show how the skill is valuable. Give this right at the start. (normally a video)
- Orientation – describe expectations, timetable, etc. (handouts, video, etc).
- Prime – remind them what they already know, test prerequisite knowledge, and/or recap relevant material. (often a video or a quiz)
- Explain – use videos backed up by specific chapters of a textbook. In the videos use spoken words and lots of visual images instead of text. Remove things added just for entertainment, decoration or interest. Split videos into 10 min chunks with a quick test after each.
- Test – check the student actually understands the material, nothing more. Check for recall of basic facts/terms and test for common misconceptions that the video should address. (e.g. Blackboard quiz, Nearpod, Mentimeter, Kahoot, quiz within Zoom, etc.)
- Model – show students how to do the task properly before asking them to do it. Ensure there is at least one fully solved example for each topic. The student should be able to see/hear your thought process as you solve the question / think through the problem, so say your thoughts out loud. Do not just use powerpoint to show the workings out even if you also discuss them, you should actually solve the question in real-time.
- Self-evaluation – teach students how to grade/judge their own work by giving them examples of past work and first showing how you mark some then getting them to discuss the marks they would give to other pieces. This will make the feedback and practice much more effective.
- Collaborative-practice / individual-practice – create lots of activities that allow the student to build the relevant skills, start easy and get harder. Design at least some tasks to get students working together collaboratively. These could be synchronous or asynchronous.
- Feedback – focus entirely on telling students how to do better next time. Ensure students can put the feedback into practice. Do not give grades out at the same time as feedback.
- Labs
- Assessment
- Other
Format
What piece of technology will students use to access the material? Or, if it is not online, how is it delivered?
Some recommended software:
- A video
- Quiz/survey software
- Library or linked resource
- Book
- Journal
- Link to a website
- Reading lists
- File (e.g. PDF, word doc, etc.)
- Video conference
Duration
How long do you expect the student to take to complete the activity? For a video, especially if it is very technical, you might expect them to take 1.5x the duration of the video, if you include pausing to take notes, and rewatching particularly hard parts.
Be generous with the time you allocate here, it’s hard as an expert (lecturer) to predict how long it will take a novice (student) to complete something. Better to add in optional material for those who want more, than force the majority to rush through. If you have optional material (first, make sure that students can get top marks without it) set the time as 00:00 as you will not expect most students to do it, but those who find the rest of the material easy will complete it quicker and have extra time for the optional material.
Title / Number
So that both you and the student can refer to specific pieces of material in emails and questions it really helps if every item is given a unique name or number. You should put the material in the order you expect the students to complete it.
Owner
The member of staff who is responsible for the content (creating and answering student questions). This is only useful if more than one staff member is creating content for this course, but it should help the students know who to direct questions to and help you keep track of what you still have left to do when creating material.
Comment / Description
This should help your reviewer with the context by providing a few further details. Some will be fairly self explanatory, e.g. a 10 min video entitled “the components of a substation” doesn’t really need a description, but a 1-hour collaborative-practice activity does.