Identifying which students have passed a test using a Performance Smart View

A smart view offers a custom/filtered view of the Gradecentre. The guide below looks at how to create a Performance Smart View to identify students who have achieved above or below the pass mark for an item of assessment, such as an academic malpractice or health and safety test. You can also use your smart view to download data or to filter and email students via Gradecentre.
To find out more, you can watch the short video or follow the quick steps below:
Quick steps:
To set up the Performance smart view follow the steps below:
- In Blackboard make sure Edit mode is switched ON.
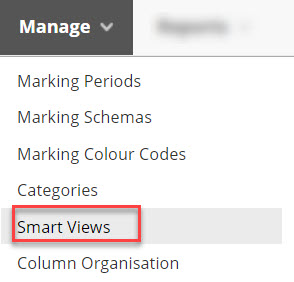
- Go to Control Panel>Gradecentre>Full Gradecentre
- Above the Gradecentre choose the menu option Manage and then select Smart Views
- A new window will open with a list of any existing smart views. Above the list of Smart Views click on the button Create Smart View.

- In the Create Smart View window. Give the Smart View a Name eg. Malpractice – failed.
- Add a tick to the checkbox Add as Favorite

In the Selection Criteria section enter data as follows:
- Type of View select Performance
- Select Criteria in the User Criteria field, use the dropdown menu to select the relevant Gradecentre column for the assignment you want to create the smart view for.
- Condition use Greater than or Less than.
- Value enter the score that you want to filter on eg. 70.

- Filter Results: Choose Selected Columns Only if you want to show just the chosen assessment and then from the dropdown list pick the appropriate Gradecentre column.
- Finally choose Submit to save the Smart View.
You can access the smart view underneath the Full Grade Centre.
The smart view looks at whatever marks are currently in the Gradecentre. Therefore, if students are taking the test over a period of weeks, you can return to the smart view to check for any changes.
How can I download data from my smart view?
You can download the results of your smart view as a CSV file. To do that, follow the instructions below:
- Go to the Gradecentre area and open your smart view, by clicking on your menu shortcut.
- Above the smart view results, choose Work Offline>Download

- In the Download Marks window choose the following settings:
- Delimiter Type choose Comma.
- Include Hidden Information leave as No.
- Download location leave as My Computer
- Next choose Submit and then Download to begin the file download.
- The download file will usually appear in the bottom left corner of your screen.
- You may receive a warning message asking if you trust the source. Click Yes to open the file.

Identify and email students based on test result
- Go to the Gradecentre area and open your smart view, by clicking on your menu shortcut.
- Once the smart view opens. You can either tick the box next to last name to
- Then Choose Email>Email Selected Users.
- You can select or deselect all users using checkbox next to Last Name or select individual users as required.

- A new email window will open so that you can type and send your message to the selected users.